
Yoga to Target Stiffness
Stiffness, especially in the back, shoulders, and neck, can result from stress and tension. So if you experience stiffness often — if you spend long hours sitting at a desk or hunched over a computer, for example —you may want to incorporate some yoga to target stiffness into your routine.
Yoga is a powerful practice that has been used for centuries to help people alleviate stiffness, improve their physical. and mental well-being. In addition to increasing flexibility and strength, yoga has been shown to reduce stress, relieve stiffness, improve sleep, and enhance the overall quality of life.
Whether you're a seasoned or a beginner yogi looking to try something new, incorporating yoga into your daily routine can help you release tension, muscle stiffness, weight loss, and feel more relaxed and energized.
In this article, we'll explore some of the top yoga poses for alleviating stiffness and tension in your body. These yoga poses will help to ease the tension in your muscles, making them less prone to stiffness. You can add them to your regular practice once or twice weekly. Try practicing these yoga poses independently or as part of a longer sequence to relieve muscle stiffness.
Warm-Up: Yoga for Stiffness
1. Breaths
First, lie on the floor with your hands at your sides, while maintaining good alignment with your head, shoulders, and hips. Second, close your eyes, while bringing your knees toward each other, and tuck your shoulder blades. Then, hold this position for several deep belly breaths, in through your nose and out through your mouth.

Routines: Yoga for Stiffness
1. Knees to Chest
First, lie on your back, your knees bent, and your shoulder blades on the floor. Bring both knees toward your chest, holding onto your knees with both arms, looking for a light stretch in the lower back and glutes, then slowly rock from side to side. After that, take a few belly breaths, in through your nose and out through your mouth. Then relax and return to the starting position.

2. Happy Baby
Lie on the floor with your knees bent, relaxing your upper body. Then, lift your legs and hold your big toes with each hand, pulling down toward the shoulders with your knees wide apart. Afterwards, hold the position for several deep belly breaths, in through your nose and out through your mouth. Then relax and repeat the movement.
To intensify the movement, you can hold on to both feet, spread your legs wider, and rock your knees from side to side.

Variation 1: Happy Baby
First, lie on the floor with your knees bent, while relaxing your upper body. Secondly, lift your legs and hold your big toes with each hand. After that, bring one leg out to the side, stretching your leg and arms. Then, hold the position for several deep belly breaths, in through your nose and out through your mouth. Finally, relax and repeat the movement on the opposite side.
You can opt to hold the outer edges of your feet and rock side to side.
 |
 |
 |
3. Progressive Exercises 1
a. Fire Hydrant with Knee Circles
At this point, begin in a 4-point position with your hands under your shoulders and your knees underneath your hips. After that, engage your core and bring one knee out to the side, then begin a sweeping circular motion in one direction. Then, lower your leg back to the starting position and repeat the movement in the opposite direction. Start with 1 set of 5 repetitions.
 |
 |
 |
b. Bird Dogs
Begin in a 4-point position, with your hands underneath your shoulders and your knees underneath your hips. After that, contract your abdominal area. Take a deep breath and lift one arm to align with your shoulder as you extend your opposite leg behind your body, then keep your hips and shoulders parallel to the floor. Exhale to return to the center, while bringing your elbow towards your bent knee and rounding out your low back as you slowly drop your head towards your chest. Then repeat the movement.
 |
 |
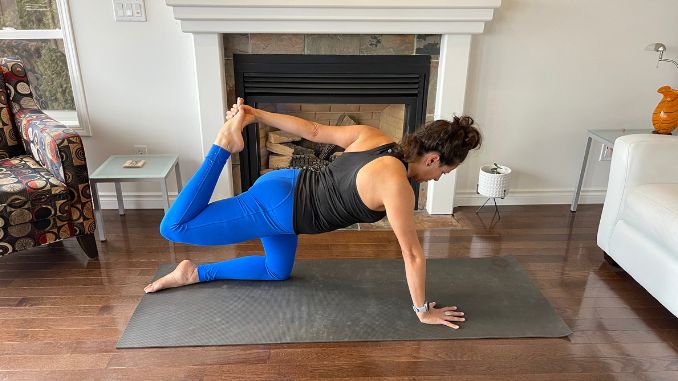
c. Tiger Pose
From the Bird Dog position. With your right hand, grab your left foot, while pushing the foot into the hand. Gently pull your foot towards you, while stretching your hips. After that keep your left hand firmly on the floor to keep your balance. Then relax and return to the starting position.
To intensify the movement, raise your joined foot and hand.
To move easily, reach back without holding your foot.
Repeat #3- Progressive Exercises 1 (do these repeat exercises on the opposite side).
4. Child’s Pose
First, begin in an upright kneeling position on the floor with your knees wider than shoulder-width apart. Second, tighten your abdominal area. After that, shift your hips back to your feet and extend your arms in front. Then, drop your forehead on the floor, relaxing your mid-back area for a light stretch. Lastly, take a couple of deep belly breaths in through your nose and out through your mouth. Then relax and return to the starting position.

5. Progressive Exercises 2
a. Lizard Lunge with Hip Circles
At this point, begin in a 4-point position with your hands beneath your shoulders and your knees under your hips, maintaining good alignment. After that, take a big step forward with one foot into a low lunge position and plant your foot on the outside of your hand to widen your hips. Then keep your toes pointing straight ahead. Tighten your abdominal area. Palms pressed firmly on the floor for support. Then, push your front foot back to straighten your leg, pushing your hips up to start a circular movement. Repeat the movement in the opposite direction.
 |
 |
 |
 |
b. Lizard Pose to Half Splits
From the Lizard Lunge with Hip Circles. Bring your front foot to the center of your hands, then inhale as you open your chest up. Then, exhale as you push your hips back to straighten your left leg, and plant your heel on the floor while keeping your hands touching the floor for support. After that, hold this position for a few belly breaths, in through your nose and out through your mouth. Then relax and return to the starting position. Repeat the movement starting with 1 set of 5 repetitions.
To intensify the movement at the end position, rock your hips from side to side.
You can use yoga blocks, pillows, or books for support.
 |
 |
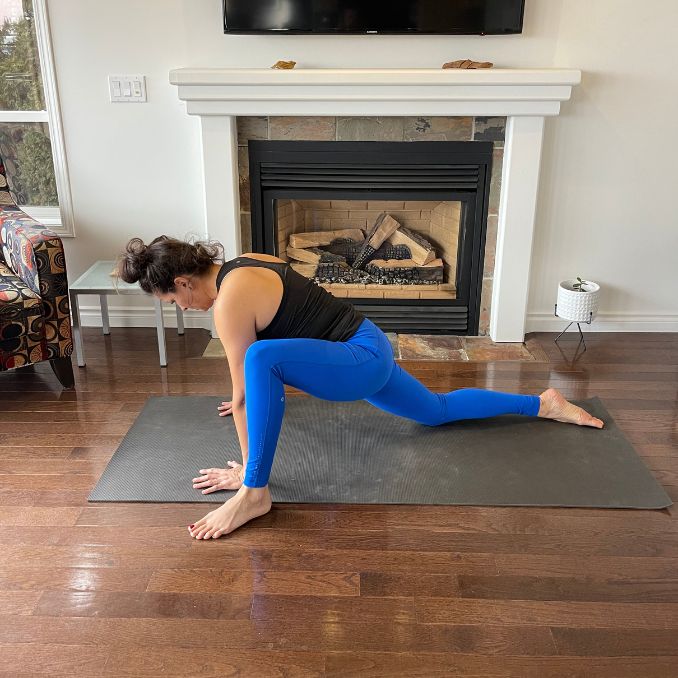
c. Lizard Lunge
From the end position of Lizard Pose to Half Splits. Bend your left knee forward, returning to a low lunge position, while planting your foot on the outside of your hands to widen your hips. then engage your core and palms pressed firmly on the floor with arms straight. After that, keep your toes pointing straight ahead and your spine straight. Then hold this position for several deep belly breaths, in through your nose and out through your mouth.

Variation 1: Regular Lizard Pose
From the Lizard Lunge position. Bend your elbows down to the floor, with your head facing down. Then hold this position for several deep belly breaths, in through your nose and out through your mouth.

Variation 2. Low Lizard Pose
From the Regular Lizard Pose position. Slowly slide your arms overhead and lower your head to the floor as much as you can. Then hold this position for several deep belly breaths, in through your nose and out through your mouth. Step back to the starting position.

d. Low Lunge with Quad Stretch
From the Low Lizard Pose position. Raise your upper body up, with hands planted on the side for support. Engage your core and bend your back foot up with your toes pointing towards the ceiling. Grab your foot with your left hand, pushing your foot toward your hips while keeping your gaze towards the sky, looking for a light stretch. Hold this position for several deep belly breaths, in through your nose and out through your mouth. Relax and return to a 4-point position.
If you cannot grab your foot, just bend your back foot with your toes pointing toward the ceiling with your hands reaching out.

Repeat #6. Progressive Exercises 2 (do these repeat exercises on the opposite side).
6. Progressive Exercises 3
a. Downward Facing-Dog
Begin in a four-point position with your hands beneath your shoulders and your knees under your hips, while maintaining a good alignment with your head, shoulders, and hips. Then tuck your toes and engage your core. Push back with your arms strengthening your legs, tailbone pointing toward the sky.

b. Walk the Dog
From the Downward Facing-Dog position, tighten your abdominal muscles then push back with your arms strengthening your legs and bend one knee to lift your heel off the floor. After that straighten your left leg and lower your right heel back to the floor. Then repeat the movement on the opposite side. Repeat the movement, alternating legs.
 |
 |
c. Downward Dog with Toe Raises
From the Downward Facing-Dog position, engage your core. Straighten both legs and push away from the floor with both hands to raise your hips high and tucking your toes under. Try to gaze towards the belly and tuck your chin in. Lower both heels, returning back to the starting position.

d. Three Legged Downward-Facing Dog
From the Downward Facing-Dog position, contract your core, then extend one foot up towards the sky and the opposite foot is planted on the floor. Keep your hips and shoulders pointing forward to square your hips. Lower your forehead towards the floor while keeping your gaze towards the back. Hold this position for a few belly breaths, in through your nose and out through your mouth.

e. Three Legged Downward-Facing Dog with Hip Opener
From the Downward Facing-Dog position, maintain good alignment. Reach one leg up towards the sky and bend the top knee, stacking your hips. Pull back your shoulders in straight line, opening the heart, then squeeze the shoulder blades. Drop your forehead down towards the floor and keep your gaze behind.
 |
 |
f. Crescent Lunge
From the Three Legged Downward-Facing Dog with Hip Opener, bring the right leg between both hands, drop the back knee and reach the arms up towards the sky. Drop the arms back, elbows pointing towards the sky while keeping your gaze up and your toes pointed straight ahead. Lower your hips and hold this position for a few deep belly breaths. On your next inhale, extend the arms and arch your back slightly as you lean your hips forward. Take a few deep breaths in through your nose and out through your mouth. Relax and return to the starting position.
 |
 |
 |
7. Crescent Pose with 3D Taps
From the End position of the Crescent Lunge, release the hand bind and maintain good alignment with your head, shoulders, hips, and legs. Engage your abdominal muscles, then lower your back knee towards the floor while keeping your toes tucked. Repeat the sequence of movement three times. Step back to return to the starting position.
 |
 |
8. Reverse-Revolve Warrior
Begin in an upright standing position with your feet considerably wider than shoulder-width apart, maintaining good alignment in your upper body. Bend one knee and pivot your foot so your toes point to the side, ideally at a 45-degree angle. Contract your core. Raise your arms overhead, then shift your upper body towards your bent knee, arching your back and reaching back with your hand. Place your other hand against the back of your straight leg. Hold this position for several deep belly breaths, in through your nose and out through your mouth. Relax and return to the starting position.

9. Warrior II
Begin in an upright standing position with your feet considerably wider than shoulder-width apart, maintaining good alignment in your upper body. Bend one knee and pivot your foot so that your toes point to the side, ideally at a 45-degree angle. Contract your core and extend your arms out at your sides at shoulder height. Turn your head to the same shoulder side to either focus on your front middle finger or to an unmoving object in front of you. Take several deep belly breaths, in through your nose and out through your mouth. Relax and return to the starting position.

10. Sky Archer
First, begin in an upright standing position with your feet considerably wider than shoulder-width apart, maintaining good alignment in your upper body. Then, engage your core. After that, raise both arms overhead and hold your hands together. Use your left hand to pull your right hand towards the back while slightly bending your front leg for comfort. Lean into your back leg for a great side-body stretch. Hold this position for several deep belly breaths, in through your nose and out through your mouth. Relax and return to the starting position.

11. Triangle Pose
Begin in an upright position with your feet considerably wider than shoulder-width apart, maintaining good alignment in your upper body. Pivot one foot so that your toes point out to the side, then slowly bend your knee as you lower your upper body over your bent knee with your hand touching the floor. Then, contract your core and reach upward with your opposite arm, opening the front of your body. Lastly, hold this position for several deep belly breaths, in through your nose and out through your mouth. Relax and return to the starting position.

12. Forward Fold
First, begin in an upright standing position with your feet considerably wider than hip-width apart, maintaining good alignment with your head, shoulders, hips, and legs. Second, tighten your core and hinge through your hips to bend your upper body forward. Third, slowly lower your head and hands down to the floor while keeping your knees slightly bent. After that, hold this position for several deep belly breaths, in through your nose and out through your mouth. Relax and return to the starting position.
To intensify the stretch, walk your hands towards the middle or behind the feet.

13. High Plank
Begin in a 4-point position, with your knees below your hips and your hands beneath your shoulders. Move into a straight-arm plank position, while maintaining good alignment with your head, shoulder, hips, and toes. Take several deep belly breaths, in through your nose and out through your mouth. Raise back up to the starting position.

14. Baby Cobra
Lie on your stomach with your feet shoulder-width apart, while maintaining good alignment with your head, shoulders, hips, and legs. Contract your abdominal muscles and slightly lift your mid-back off the floor using your hands as support. Hold this position for several deep belly breaths, in through your nose and out through your mouth. Relax and return to an upright sitting position.

Repeat Progressive Exercise 3 Pose to Crescent Lunge, 3D Tops, Reverse-Revolve Warrior, Warrior II, Sky Archer, Triangle Pose, and Forward Fold (repeat the exercises in the opposite side)
15. Forward Fold with Humble Warrior Hands
Begin in an upright standing position with your feet considerably wider than hip-width apart, while maintaining good alignment with your head, shoulders, and hips. Contract your core and interlace your hands behind your back. Hinge through your hips to bend your upper body forward and extend your joined hands away from your back. Hold this position for several deep belly breaths, in through your nose and out through your mouth. Relax and return to an upright position.

Cool Downs: Yoga for Stiffness
1. Hugging Arms with Twists
Begin in an upright standing position with your feet hip-width apart, while maintaining good alignment with your head, shoulders, and hips. Wrap your body with both arms and stabilize your feet, then pull your thighs up. Take a few breaths, relaxing your body. When you are relaxed, swing your upper body to the sides. Keep swinging from the left to right, then slow down. Take a few deep belly breaths, in through your nose and out through your mouth. Relax and return to the starting position. Repeat the movement with your left arm over your right arm.
 |
 |
 |
Begin in an upright standing position with your feet hip-width apart, while maintaining good alignment with your head, shoulders, hips, and legs. Wrap your body with your arms and tighten your core. Hinge through your hips to bend your upper body forward. Slowly lower your head while keeping your knees soft. Hold this position for several deep belly breaths, in through your nose and out through your mouth. Raise back up to return to the starting position.
|
 |
Repeat Child’s Pose
2. Heel Sitting with Top Toes Stretch
Begin in an upright kneeling position, while maintaining good alignment with your head, shoulders, and hips. Engage your core. Sit on your heels with your feet together, then bring your weight forward. e your core, sit on your heels with your feet together, and bring your weight forward. Using your hands as support, inhale, lift both knees up, then exhale, lower your knees to return to a heel-sitting position. Relax and repeat the movement. Start with 1 set of 5 repetitions.
 |
 |
Variation. Heel Sitting with Top Toes Stretch
Begin in an upright kneeling position, while maintaining good alignment with your head shoulders, and hips. Sit on your heels with your feet together, then bring your weight forward. Engage your core, using your hands as support, inhale as you lift one knee up, exhale and lower your knee to return to a heel-sitting position. After that alternately repeat the movement on each side. Then start with 1 set of 5 repetitions.
 |
 |
3. Toe Sit
Begin in an upright kneeling position, while maintaining good alignment with your head, shoulders, and hips. Then, shift your hips back to rest your seat on your feet. Engage your core, while placing your hands on your thighs, and close your eyes. After that hold this position for several deep belly breaths, in through your nose and out through your mouth.

Variation Exercise. Toe Sit
Firstly, begin in a four-point position with your hands underneath your shoulders and your knees underneath your hips. After that, contract your abdominal area. Then, bring your feet together, soles facing toward the sky. Then, slowly lower your feet to the ground. Keep your palms planted on the ground and gently tap your feet several times. Relax and return to the starting position. Alternately lower each foot with 1 set of 5 repetitions.
 |
 |
4. Supine Bound Angle
First, lie on your back on the floor, while maintaining good alignment with your head, shoulders, hips, and legs. Second, place your hands at your sides and tighten your abdominal muscles. Third, bring the soles of your feet together, opening your knees out to the sides. After that, hold this position for several deep belly breaths, in through your nose and out through your mouth. Lastly, relax and return to the starting position.

5. Corpse Pose
First, lie on your back on the floor, while maintaining good alignment with your head, shoulders, hips, and legs. Then, place your arms to your sides with your legs extended and relaxed, eyes closed, palms facing up. Then, hold this position for several deep belly breaths, in through your nose and out through your mouth.

6. Full Body Stretch
Lie on your back on the floor, maintaining good alignment with your head, shoulders, hips, and legs. Then, bring your hands overhead and interlace your fingers. Afterward, take a big reach of your arms and straighten both legs to take a deep stretch. Hold this position for several deep belly breaths, in through your nose and out through your mouth. Relax and return to the starting position.

Repeat Knees to Chest
7. Side Fetal Pose
Lie on your side on the floor with your knees bent, maintaining good alignment in your upper body. Then, extend your bottom arm overhead and rest your head on your outstretched arm. Keeping your feet together, Close your eyes. Lastly, Hold this position for several deep belly breaths, in through your nose and out through your mouth.

8. Seated Prayer Hands
Begin in an upright sitting position, maintaining good alignment with your head, shoulders, hips, and legs. Then, cross your legs, then bring your palms together to your chest, and once you feel relaxed, hold this position for several deep belly breaths, in through your nose and out through your mouth. Lastly, return to the starting position.

Muscle stiffness and discomfort can be a frustrating and limiting experience, but yoga offers a natural and effective way to ease tension and promote relaxation. Yoga poses can help to relieve stiffness and pain while increasing flexibility. This is because they stretch muscles and tendons, increase circulation in your muscles and joints, and improve core strength.
If you have muscle stiffness, you may feel pain during yoga exercise and even after. That's because your muscles try to get in the best position to work but can't stretch properly. The muscles are stiffer than normal, making them less elastic and more prone to pulling on certain body parts.
The most important part of practicing yoga for stiffness is ensuring you have a good grounding and a sense of where your body is.
