
Restorative Yoga: Postures to Improve Alignment & Reset Nervous System
Restorative Yoga Poses are a form of Yoga that focuses on relaxation, healing, and rejuvenation of the mind and body. It involves gentle postures held for extended periods, usually with the support of props such as blankets, bolsters, pillows, and blocks, which help the body relax deeply and release tension. Restorative Yoga Poses are suitable from beginner yoga practitioners to pro. Restorative Yoga is particularly beneficial for people who are recovering from injuries or illness, as well as those who experience stress and anxiety.
The main goal of Restorative Yoga is to improve alignment and posture and reset the nervous system. The practice restorative yoga involves a series of postures designed to release tension and promote relaxation. The postures are typically held for several minutes, allowing the body to relax and fully release any tension or stress. Below are simple Restorative Yoga poses that you can do at home.
Restorative Yoga Poses
1. Windshield Wipers
Begin in an upright sitting position on the floor with your knees bent and your feet flat on the floor, close together while maintaining a good alignment in your upper body. Then plant your hands on the floor at your sides for support. After that engage your core and lower both knees to one side. Afterward, repeat the movement in the opposite direction. Start with 1 set of 5 repetitions on each side.
 |
 |
2. Wide Legged Forward Fold
For this exercise, you need a pillow or a cushion for support.
Begin in an upright sitting position in front of a pillow on the floor, while maintaining good alignment with your head, shoulders, and hips. Then slightly extend both of your legs in front of your body. and contract your core. After that place your arms on top of the pillow, then hinge through your hips to bend your upper body, lowering your head towards the pillow. Afterward, hold the position for several deep belly breaths, in through your nose and out through your mouth. Then, slowly raise back up, returning to an upright sitting position.
You can stack two or more pillows to make the pose more comfortable.

Variation 1: Wide-Legged Forward Fold
Begin in an upright sitting position on the floor, while maintaining good alignment with your head, shoulders, and hips. Then slightly extend both of your legs in front of your body and contract your core. Slide your hands forward, then hinge through your hips to bend your upper body, lowering your head towards the floor. After that hold the position for several deep belly breaths, in through your nose and out through your mouth. Then, slowly raise back up, returning to an upright sitting position.

Wide-Legged Forward Fold
Variation 2: Wide-Legged Forward Fold
Begin upright on the floor with your legs extended and spread out to the side, keeping your toes pointing upward while maintaining good alignment with your head, shoulders, and hips. Interlace your fingers at the back of your head. Then engage your core and slowly fold forward your upper body, with your head bowed down to the floor, only allowing the weight of the arms to do the work do not pull your head down; let gravity do its work. After that hold the position for several deep belly breaths, in through your nose and out through your mouth.

Repeat Windshield Wipers
3. Seated Butterfly Pose
Use yoga blocks, cushions, or pillows to support the back of your shoulders for this exercise.
Begin in an upright sitting position with your knees bent and feet flat on the floor. Then bring the soles of your feet together, spreading your legs out to the sides. And place a cushion or pillow at the back. After that tighten your core and open your knees to the sides, keeping your spine straight. Afterward, hold the position for several deep belly breaths, in through your nose and out through your mouth.

4. Supported Butterfly Pose- Heart Opener
At this point, from the Seated Butterfly position. Then place your hands on your side for support as you slowly lower your back towards the cushion or pillow. After that spread your arms wide at your side or place each hand on your heart center and on your belly. Afterward, hold the position for several deep belly breaths, in through your nose and out through your mouth.
 |
 |
5. Supine Butterfly Pose to Figure 4
From the end position of Supported Butterfly Pose- Heart Opener. Remove the cushion or pillow and lie on your back on the floor in a butterfly position. Then hold the position for a couple of seconds, then slowly bend your knees flat on the floor, cross one ankle over the opposite knee, and flex your foot. After that hold the position for several deep belly breaths, in through your nose and out through your mouth. Repeat the movement on the opposite side.
 |
 |
Variation 1: Supine Butterfly Pose to Figure 4
Lie on the floor with your knees bent and your feet wider than hip-width apart, maintaining good alignment of your head, shoulders, hips, and knees. Then cross one ankle over the opposite knee and flex your foot. After that lift both legs and hold onto your bottom leg with both hands. Afterward, pull your bent legs closer to your body to intensify the stretch, and hold this position for several deep belly breaths, in through your nose and out through your mouth.
To intensify this movement, hug both knees and pull them closer to your chest as much as your body allows.

6. Knee to Chest
Lie on your back on the floor with your knees bent and your feet flat on the floor. Bring both knees to your chest, then wrap your hands around your knees. After that engage your core and curl your body as you lift your head towards your knees. Afterward, hold the position for several deep belly breaths, in through your nose and out through your mouth.

7. Happy Baby
Lie on your back on the floor with your knees bent and feet flat on the floor, while relaxing your upper body. Then lift your legs and hold your toes with each hand, pulling down toward the shoulders with your knees wide apart. After that hold the position for several deep belly breaths, in through your nose and out through your mouth.
To intensify this exercise, gently rock your lower spine from side to side.

Variation 1: Happy Baby
Lie on your back on the floor with your knees bent and your feet flat on the floor. Then bring your bent knees closer to your chest and hold your feet with each hand to intensify the stretch. After that hold this position for a couple of seconds and bring your right leg out toward the right side while still holding your right foot. Repeat the movement alternately on the opposite side. Afterward, complete 5 repetitions on each side.
 |
 |
Variation 2: Happy Baby
Lie on your back on the floor with your knees bent and your feet flat on the floor. Then bring your bent knees closer to your chest and hold your feet with each hand to intensify the stretch. After that hold this position for a couple of seconds and bring each leg out to the sides while still holding your feet. Then repeat the movement several times.

8. Spinal Twist
Lie on your back, your knees bent, and your feet flat on the floor, hip-width apart. Spread your arms at your side, while relaxing your upper body. Then engage your core, then twist through the lower back, pelvis, and spine to bring both knees to one side. After that hold this position for several deep belly breaths, in through your nose and out through your mouth. Then return to the starting position and repeat the movement on the opposite side.
To intensify this movement, turn your head to the opposite side of your knees.

Variation 1: Spinal Twist
At this point, from the spinal twist position. Engage your core and wrap your left leg over your right leg to deepen the stretch. After that you can extend your arms to the side or bend your elbows at a 90-degree angle doing a cactus position. Then hold the position for several deep belly breaths, in through your nose and out through your mouth.

Variation 2: Spinal Twist
Lie on your back on the floor with your knees bent and your feet hip-width apart, while relaxing your upper body. Then engage your core, bring your right knee to your chest, and straighten your left leg. After that twist through your lower back, pelvis, and spine to bring your right knee down to your left side. Then turn your head to the right and gaze straight ahead. Afterward, old the position for several deep belly breaths, in through your nose and out through your mouth.

Variation 3: Spinal Twist
Lie on your back on the floor with your knees bent and your feet hip-width apart, while relaxing your upper body. Then engage your core, bring your right knee to your chest, and straighten your left leg. After that twist through your lower back, pelvis, and spine to bring your right knee down to your left side. Turn your head to the right and gaze straight ahead. Then gently reach for your right foot with your left hand to deepen the stretch. Afterward, hold the position for several deep belly breaths, in through your nose and out through your mouth.

Repeat the following movements:
- Knee to Chest
- Spinal Twist (on the opposite side)
- After performing the Spinal Twist, repeat the following routines.
- Knee to Chest
- Happy Baby
9. Curling Up and Down
Lie on your back with your knees bent and feet flat on the floor. Then tighten your core, slightly bend your knees, and raise both legs upward. After that place your hand at the back of your knees for support. Engage your core and, using your body’s momentum, raise your body into a sitting position, then move back down into the starting position. Afterward, repeat the sequence of movement. Complete 2-3 repetitions.
 |
 |
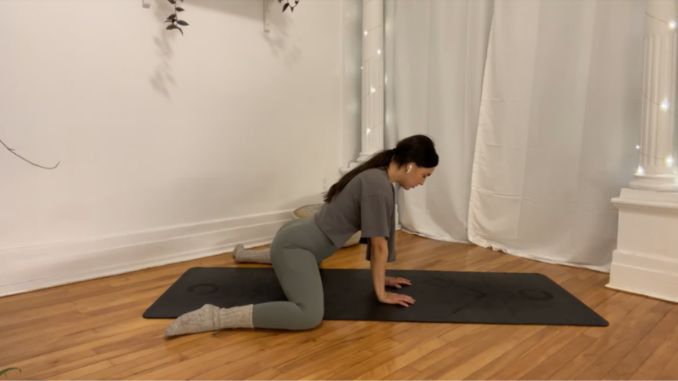
10. Progressive Exercises 1
a. Child’s Pose
Begin in a 4-point kneeling position with your hands under your shoulders and your knees under your hips. Then engage your core and shift back to your feet as you extend your arms overhead. After that lower your forehead to the floor and relax your mid-back area for a light stretch. Then take several deep belly breaths, in through your nose and out through your mouth. Afterward, relax and return to the starting position.

Variation 1 (For people with Tight Back)
Use a pillow, bolster, rolled blanket, or anything that lets your upper body be completely rested for this exercise.
Begin in an upright kneeling position in front of the pillow with your knees wider than the shoulder width apart. Then tighten your abdominal area. Shift your hips back to your feet and extend your arms in front, placing the pillow underneath your chest. Drop your forehead on the pillow, while relaxing your mid-back area for a light stretch. After that take a couple of deep belly breaths in through your nose and out through your mouth.

Variation 2 (Advanced Version)
Begin in a 4-point kneeling position with your hands under your shoulders. Then move your knees out to the side by closing your toes together to widen your knees. After that tighten your abdominal area and shift your hips back to your feet as you extend your arms overhead. Then walk your hands to one side and lower your head to relax your mid-back area. Afterward, hold this position for several deep belly breaths, in through your nose and out through your mouth. Relax and repeat the movement on the opposite side.
 |
 |
 |
b. Thread the Needle
From the end position of Child’s Pose- Variation 2. Return to a neutral position, rotate your upper body upward, and extend one arm towards the sky, keeping your gaze upward. Then rotate back and slide the same arm under your body with your palm facing upward, lowering your shoulder to the floor. After that rest the side of your head on the floor and place the opposite arm on your mid-back, and hold this position for several deep belly breaths, in through your nose and out through the mouth. Relax and repeat the movement on the opposite side.
 |
 |
 |
c. Frog Pose
Begin in a 4-point position with your hands beneath your shoulders and your knees under your hips. Inhale and slowly move your right and left knee out towards the side as you exhale. Then open your hips as you turn your feet out towards the side and flex your ankles so that your inner feet, inner ankles, and inner knees are touching the floor. After that engage your core and slowly walk your hands forward to lower your upper body to the floor as you extend your arms in front. Then hold the position for several deep belly breaths, in through your nose and out through your mouth.
 |
 |
Variation 1: Frog Pose
Use a pillow, bolster, rolled blanket, or anything for this exercise for support.
Begin in a 4-point position with your hands beneath your shoulders and your knees under your hips. Then place a cushion or a pillow below your knees. Inhale and slowly move your right and left knee out towards the side as you exhale. After that open your hips as you turn your feet out towards the side. Engage your core and slowly lower your upper body by lowering your forearms into the floor with your palms pressed together in prayer. Hold the position for several deep belly breaths, in through your nose and out through your mouth.
 |
 |
Repeat Child’s Pose
11. Progressive Exercises 2
a. Virasana (Hero Pose)
Begin in an upright kneeling position on the front part of the mat, with your head, shoulders, and hips in proper alignment. Then shift your weight onto your hips and sit on the mat between your feet, with your toes pointing at a 45-degree angle. After that contract your core and hold this position for several deep belly breaths, in through your nose and out through your mouth.
If this pose is too easy, you can proceed with Recline Hero Pose.

b. Recline Hero Pose
From the Virasana (Hero Pose), engage your core. Then lean your upper body toward the back and plant your hands on the floor behind you for support. Drop your head backward as low as possible, then close your eyes. After that hold this position for several deep belly breaths, in through your nose and out through your mouth.
If you feel pain in this movement, immediately get up and stop. But if this pose is too easy for you, you can proceed with another Variation of Recline Hero Pose.
 |
 |
Variation 1: Recline Hero Pose
From the Virasana (Hero Pose). Engage your core. Lean your upper body toward the back and put your hands on the floor behind you for support. Gently bend and lower your elbows as you lower your upper body backward as much as possible. Plant your elbows on the floor for support. Place your hands at the sole of your feet at your sides and keep your gaze upward. Hold this position for several deep belly breaths, in through your nose and out through your mouth.
If you feel pain in this movement, immediately get up and stop. But if this pose is too easy for you, you can proceed with Supta Vajrasana (Sleeping Thunderbolt Pose)

c. Supta Vajrasana (Sleeping Thunderbolt Pose)
From the Recline Hero Pose (Variation 1). Engage your core. Lower your upper body all the way down on the floor. Put your arms overhead and take several deep belly breaths, in through your nose and out through your mouth. You can place your thumbs on the soles of your feet to stimulate blood flow.
If you feel pain in this movement, immediately get up and stop.

Alternative Restorative Yoga Poses for people with Knee issues
a. Alternative Exercise 1
Begin in an upright kneeling position on the floor with your head, shoulders, and hips properly aligned. Tighten your abdominal area, and shift your hips back to your feet. Place your hands on your thighs and straighten your spine. Hold the position for a several deep belly breaths, in through your nose and out through your mouth.

b. Alternative Exercise 2
Begin in an upright kneeling position with your knees close together, lower your seat onto your ankles, keeping your toes curled under your body weight. Place your hands on your thighs. Engage your core and straighten your spine. Hold the position for a several deep belly breaths, in through your nose and out through your mouth.

After doing Progressive Exercises 2
12. Foot Taps
Begin in a 4-point position with your hands beneath your shoulders and your knees under your hips. Contract your abdominal area and gently move your foot alternately into a tapping movement. Complete 5-10 repetitions.
 |
 |
13. Candlestick
Lie on your back with your knees bent and feet flat on the floor. Place your hands on your side, relaxing your upper body. Tighten your core and raise both legs upward at a 90-degree angle. Hold the position for several deep belly breaths, in through your nose and out through your mouth.

Variation 1: Candlestick
You can use a cushion or a pillow for this exercise.
Lie on your back with your knees bent and feet flat on the floor. Place your hands on your side, relaxing your upper body. Tighten your core and raise both legs upward at a 90-degree angle. Hold the position for several deep belly breaths, in through your nose and out through your mouth.

14. Corpse Pose
Lie on your back on the floor with your legs stretched out, maintaining good alignment with your head, shoulders, hips, and legs. Bring your arms to your sides, palms facing up, and close your eyes. Hold the position for several deep belly breaths, in through your nose and out through your mouth.

15. Full Body Stretch
Lie on your back on the floor, maintaining good alignment with your head, shoulders, hips, and legs. Engage your core and bring your arms overhead, taking a big reach as you stretch your legs long. Hold this position for several deep belly breaths, in through your nose and out through your mouth.

16. Lotus /Prayer Pose
Begin in an upright sitting position, cross your left ankle over the top of your right shin. The sole of your left foot should also face upwards, and the top of your foot and ankle should rest on your hip crease. Maintaining good alignment with your head, shoulders, and hips. Pressed your palms together in a prayer position. Engage your core and close your eyes. Hold the position for several deep belly breaths, in through your nose and out through your mouth.

Overall, restorative yoga is an important practice that offers numerous benefits for both physical and mental health.
Through the use of props such as bolsters, blankets, and blocks, restorative yoga helps to achieve a profound state of relaxation and reconnection with the body. It provides a safe, nurturing space to explore the body’s sensations and identify areas of tension, allowing for a deeper understanding of self.
Lastly, restorative yoga encourages the body to self-heal, and can be both a powerful and transformative journey. With regular practice of restorative yoga, the body can become more balanced, aligned, and relaxed, allowing for a greater sense of wellbeing and inner peace. By incorporating restorative yoga postures into a regular yoga practice, individuals can experience a greater sense of calmness, relaxation, and improved overall health and well-being.
