Yoga Class Tailored to Muscle Recovery
Basically, Muscle Recovery is the body's process of repairing and rebuilding muscle tissue damaged through physical activity. This process is also essential for maintaining muscle health and promoting growth. For muscle recovery to be effective, it is important to understand the different factors that can impact it and the various methods used including yoga poses to promote it.
Factors Affecting Muscle Recovery
One of the important factors that can impact muscle recovery is the intensity and volume of the physical activity. High-intensity exercise can cause significant muscle damage, taking longer to repair. On the other hand, low-intensity exercise causes less damage and therefore requires less recovery time. Additionally, the volume of exercise, or the amount of work done, can also impact muscle recovery. Using yoga for muscle recovery is one of the best way to do this.
Another important factor that can impact muscle recovery is Nutrition. Adequate protein intake is essential for the repair and growth of muscle tissue. Additionally, carbohydrates and healthy fats are important for providing the body with the energy it needs to repair and rebuild muscle tissue. It is also important to hydrate well so that the body can flush out toxins and improve the delivery of oxygen and nutrients to the muscles that need repair.
Rest and sleep are also critical for muscle recovery. During sleep, the body produces hormones essential for muscle growth and repair. Getting enough sleep, at least 7-8 hours per night, is crucial for optimal muscle recovery.
Yoga is a form of exercise that has been practiced for thousands of years that helps muscle recovery. It is shown for its ability to improve balance and overall well-being. Stretching and Yoga can also help in muscle recovery, as they can help to reduce muscle soreness and improve flexibility.
Here are a few yoga movements that are tailored to muscle recovery. We also provided variation exercises that you can do as an option if some movements are difficult to execute.
Yoga for Muscle Recovery
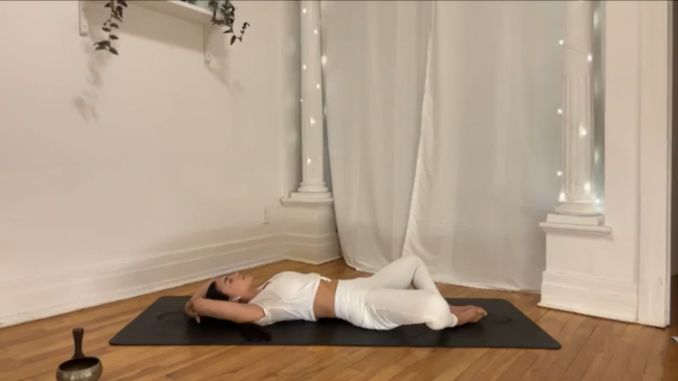
1. Lying in Breaths
Lie on your back with your knees bent and feet flat on the floor. Then place your arms around your head or on your side. After that bring your knees closer together. Relax your upper body and close your eyes. Afterward, hold this position for several deep belly breaths, in through your nose and out through your mouth.

2. Supine Butterfly Pose
Lie on your back on the floor with your knees bent and feet flat on the floor. Then place your arms around your head or on your side. After that tighten your core and open your knees to the side, bringing the soles of your feet together. Afterward, hold the position for several deep belly breaths, in through your nose and out through your mouth.
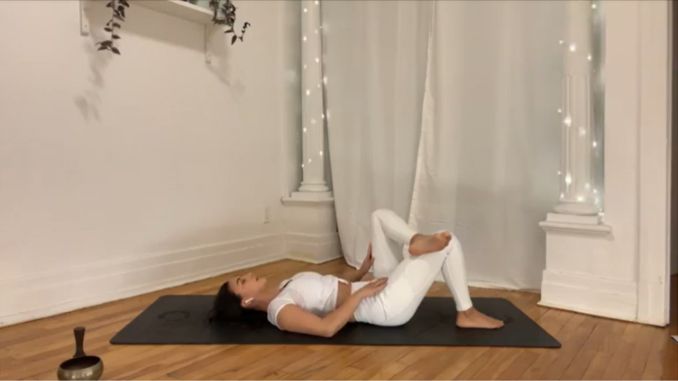
3. Knee to Chest
Lie on your back on the floor with your knees bent and your feet hip-width apart. Then bring both knees to your chest and hold onto your knees with both arms. After that lift your head and bring your nose to your knees for a good lower back and glute stretch. Afterward, hold this position for several deep belly breaths, in through your nose and out through your mouth. Relax and return to the starting position.
To intensify this movement then gently rock your knees from side to side.
 |
 |
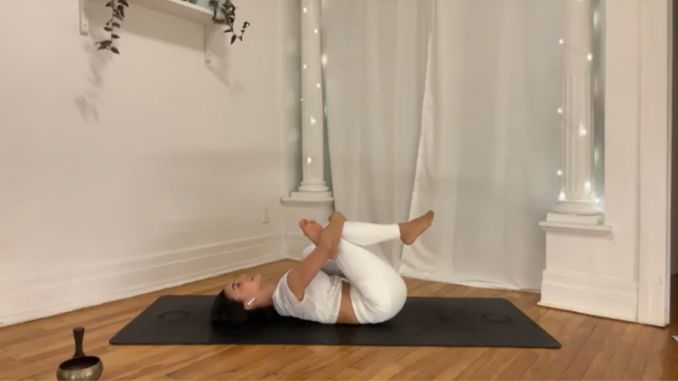
4. Happy Baby
Lie on your back on the floor with your knees bent and feet flat on the floor, while relaxing your upper body. After that lift your legs and hold your toes with each hand, while pulling down toward the shoulders with your knees wide apart. Afterward, hold the position for several deep belly breaths, in through your nose and out through your mouth.
To intensify this exercise, you can also gently rock your lower spine from side to side.

Variation 1: Happy Baby
Lie on the floor with your knees bent, while relaxing your upper body. Then lift your legs and hold your toes with each hand, while pulling down toward the shoulders with your knees wide apart. After that hold the position for a couple of seconds, then slowly move your body to the side as you bring one knee down towards your chest while holding the opposite leg up. Afterward, repeat the movement alternately on the opposite side.
 |
 |
Variation 2: Happy Baby
Lie on the floor with your knees bent, while relaxing your upper body. Then lift your legs and hold your toes with each hand, while pulling down toward the shoulders with your knees wide apart. After that engage your abdominal muscles, and spread your legs to the side, creating a wide space between your legs for a stretch while still holding on to your toes. Afterward, hold the position for several deep belly breaths, in through your nose and out through your mouth.

5. Supported Pigeon Pose
Lie on the floor with your knees bent and your feet wider than hip-width apart, while maintaining good alignment of your head, shoulders, hips, and knees. Then cross one ankle over the opposite knee and flex your foot. Afterward, lift both legs and hold onto your bottom leg with both hands. After that pull your bent legs closer to your body to intensify the stretch, and hold this position for several deep belly breaths, in through your nose and out through your mouth.
 |
 |
You can do either of the following variations of the Supported Pigeon Pose depending on how flexible you are:
Variation 1: Supported Pigeon Pose
Lie on the floor with your knees bent and your feet wider than hip-width apart, while maintaining good alignment of your head, shoulders, hips, and knees. Afterward, cross one ankle over the opposite knee and flex your foot. Then lift both legs and clasp your hands together onto your bottom knee. After that pull your bent knee closer to your body to intensify the stretch, and hold this position for several deep belly breaths, in through your nose and out through your mouth.

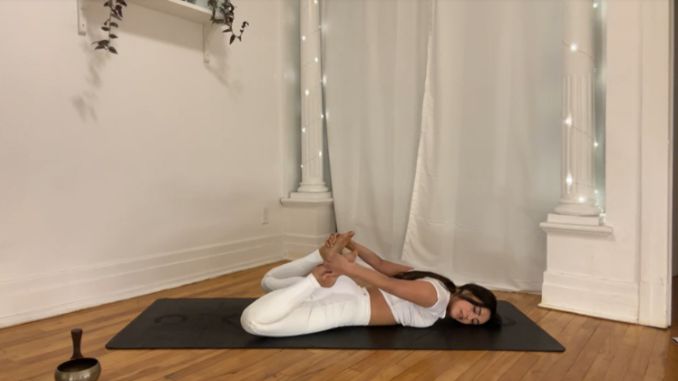
Variation 2: Supported Pigeon Pose
Lie on the floor with your knees bent and your feet wider than hip-width apart, while maintaining good alignment of your head, shoulders, hips, and knees. Cross one ankle over the opposite knee and flex your foot. Then lift both legs and wrap your hands around both knees. Afterward, pull your knees closer to your body as you lift your head, while bringing your nose closer to your knees to intensify the stretch. After that hold this position for several deep belly breaths, in through your nose and out through your mouth.
 |
 |
6. Reclined Half Cow Face Pose
Lie on your back with your knees bent and your feet flat on the floor. Cross one ankle over your opposite knee. Engage your core, then twist through the low back pelvis and spine to lower your knees to one side. Then place your arms on your side at shoulder length. After that hold this position for several deep belly breaths, in through your nose and out through your mouth. Afterward, relax and repeat the movement on the opposite side.
 |
 |
Repeat Happy Baby and Variation 1 only, then Repeat Supported Pigeon Pose, Reclined Half Cow Face Pose with your opposite leg.
7. Progressive Exercises 1
a. Cat-Cow
Begin in a 4-point position with your hands beneath your shoulders and your knees under your hips. While maintaining good alignment of your head, shoulders, hips, and knees. Engage your core. After that arch your back as you tilt your head upward. Then, tuck your tailbone in and round your spine as you lower your head downward. Repeat the sequence of movements. Complete 5 repetitions.
 |
 |
b. Disco Cow (Barrel Roll)
From the end position of Cat-Cow. Bend your upper body to one side. Roll to round your mid back out, then circle your upper body to bend on the opposite side. After that repeat the sequence of movements for several repetitions. Perform the movement on the opposite side.
 |
 |
 |
 |
c. Puppy Pose
From the end position of Disco Cow (Barrel Roll), Slowly walk your hands forward, while dropping your chest on the floor, pointing your tailbone up in the sky, and extending your arms overhead. After that hold this position for several deep belly breaths, in through your nose and out through your mouth.
To intensify the stretch, anchor your elbows on the floor while keeping your palms touching each other in a prayer position.

You can do the following variations of the Puppy Pose, depending on your flexibility.
Variation 1:Puppy Pose
From the Puppy Pose position. Tuck your toes, and straighten your legs while you keep your tailbone upward and your chest pressed down on the floor. Then hold this position for several deep belly breaths, in through your nose and out through your mouth.
|
 |
Variation 2: Puppy Pose
From the Puppy Pose position. Bend your elbows and put your hands together in a prayer pose. Then hold this position for several deep belly breaths, in through your nose and out through your mouth. After that relax and return to the starting position.

d. Sphynx Pose
From the Puppy Pose position. Lower your hips as you plant your forearms on the floor at your sides with your elbows beneath your shoulders. Then spread your fingers wide for a good base of support. Arch your back using your glutes and back muscle strength. After that gently press your elbows into the floor directly under your shoulders. Inhale and slowly pull yourself forward, while keeping your hips anchored to the mat. Afterward, hold this position for several deep belly breaths, in through your nose and out through your mouth.
You can lift both legs from the floor to intensify the movement.

e. Sphynx Pose with Neck Circles
At this point, while in the Sphynx position. Move your head in a circular motion while keeping your hips anchored to the mat. Then repeat the movement in an alternate direction. After that complete 3 circular movements in each direction. Return to the neutral position and hold the position for a couple of seconds before moving on to the next movement.
 |
 |
 |
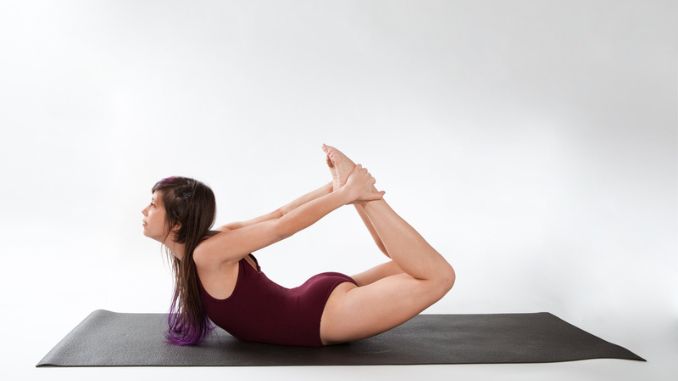
f. Bow Pose
From the Sphynx Pose with Neck Circles position. Bend your knees to bring your heels close to your buttocks. Then lift your upper body off the floor, reach back with both arms, and hold your feet to intensify the stretch. After that hold the position for several deep belly breaths, in through your nose and out through your mouth. Afterward, relax and lower your upper body to the floor with your head facing to the right side. Repeat the movement with the end position facing the opposite side.
 |
 |
 |
g. Cobra Pose
From the end position of Bow Pose. Straighten your legs and press both hands on the floor. Contract your abdominal muscles and slightly lift your mid-back off the floor using your hands as support. After that, hold this position for several deep belly breaths, in through your nose and out through your mouth.

h. Child’s Pose
From the Cobra Pose. Move into a 4-point position with your hands under your shoulders and your knees under your hips, wider than hip-width apart. Then engage your core and shift your hips back to your feet as you extend your arms overhead. After that lower your chin or forehead to the floor and relax your mid-back area for a light stretch. Afterward, hold this position for several deep belly breaths, in through your nose and out through your mouth.

8. Progressive Exercises 2
a. Lizard Pose
Begin in a 4-point position with your hands beneath your shoulders and your knees under your hips. While maintaining good alignment of your head, shoulders, hips, and knees. Then take a big step forward with one foot into a low lunge position and plant your foot on the outside of your hand to widen your hips. Then keep your toes pointing straight ahead. Tighten your abdominal area. Palms pressed firmly on the floor for support. After that hold this position for several deep belly breaths, in through your nose and out through your mouth.

If the Lizard Pose position is too easy for you, you can do Variation 1- Lizard Pose with Back Bend. If not, you can skip this part and proceed to Regular Lizard Pose.
Variation 1: Lizard Pose with Back Bend
From the Lizard pose. Raise your upper body as you rest your hands on your bent knee. Then engage your core, eyes straight ahead. Slowly bend your upper body backward to open your chest. After that hold the position for several deep belly breaths, in through your nose and out through your mouth.
Do not close your eyes while doing this movement to avoid losing your balance.
 |
 |
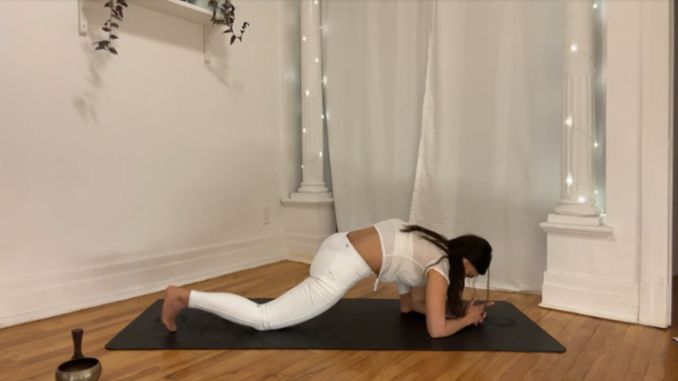
b. Regular Lizard Pose
From the Lizard Pose position. Lower your upper body as you bend and anchor your elbows to the floor, with your head facing down while keeping your spine straight. Then ensure your elbows are planted inside your bend leg to widen your hips. After that hold this position for several deep belly breaths, in through your nose and out through your mouth.

If the Regular Lizard Pose position is too easy for you, you can do Variation 1- Lizard Pose with Toe Tuck. If you still need to, you can skip this part and proceed to Lizard Pose with Twist.
Variation 1: Lizard Pose with Toe Tuck
From the Regular Lizard Pose position. Tuck your toes, then straighten your leg while keeping your elbows planted on the floor for support. Then hold the position for several deep belly breaths, in through your nose and out through your mouth. After that relax and return to the starting position.
 |
 |
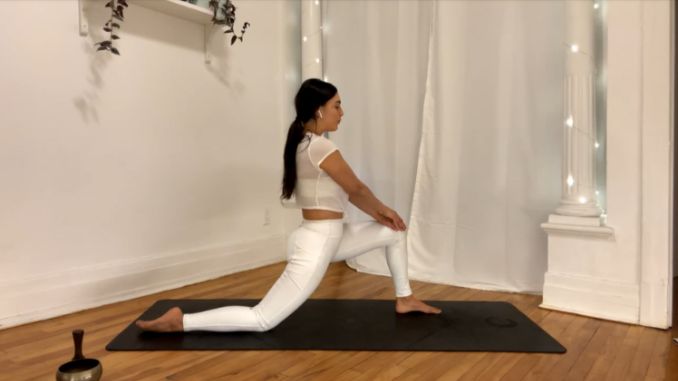
c. Lizard Pose with Twist
From the Lizard Pose position. With your hands on your sides and your right foot extended outward. Then engage your core and push your left knee with your left hand, then twist your upper body, looking toward the sky, letting the stretch open your hips. After that hold in this position for several deep belly breaths, in through your nose and out through your mouth.
 |
 |
d. Lizard Pose with Quad Stretch
From the end position of Lizard Pose with Twist. Bend your back foot up with your toes pointing towards the ceiling. Then grab your foot with your left hand, pushing your foot toward your hips while keeping your gaze towards the sky, looking for a light stretch. After that hold this position for several deep belly breaths, in through your nose and out through your mouth. Afterward, relax and return to a 4-point position.
If you cannot grab your foot, just bend your back foot with your toes pointing toward the ceiling with your hands reaching out.

Repeat Child’s Pose and Repeat the movement sequence of Progressive Exercises 2 with your opposite leg. Make sure to end Progressive Exercises 2 with Child’s Pose before moving into the next movements.
10. Half Cow Face Stretch
Begin in an upright sitting position on the floor with your legs extended in front of your body. Cross one leg over your opposite knee. Then place your hands on the side for support. After that engage your core, toes pointing towards the sky, and gaze towards the floor while keeping your spine straight. Afterward, hold the position for several deep belly breaths, in through your nose and out through your mouth.
You can move your upper body forward while maintaining a straight spine to intensify this movement.

You can do either of the following variations of Half Cow Face Stretch depending on how flexible you are:
Variation 1: Half Cow Face Stretch
At this point. Place your hands on the extended foot and grab the foot to pull your upper body forward. Then engage your core, toes pointing towards the sky, and gaze towards the floor while keeping your spine straight. After that hold the position for several deep belly breaths, in through your nose and out through your mouth.

Variation 2: Half Cow Face Stretch
At this point. Bring your left hand behind your head and your right arm onto your midback. Then grab both hands behind your back and gaze up toward the sky. After that hold the position for five deep belly breaths, in through your nose and out through your mouth. Afterward, slowly hinge through your hips to bend your upper body forward. Relax and return to the starting position.
 |
 |
11. Windshield Wipers
Begin in an upright sitting position on the floor with your knees bent and your feet flat on the floor, close together. While maintaining good alignment in your upper body. Then plant your hands on the floor at your sides for support. After that engage your core and lower both knees to one side. Repeat the movement in the opposite direction. Afterward, complete 5 repetitions on each side.
 |
 |
Repeat Half Cow Face Stretch with your opposite leg.
12. Corpse Pose
Lie on your back on the floor with your legs stretched out, while maintaining good alignment with your head, shoulders, hips, and legs. Then bring your arms to your sides, palms facing up, and close your eyes. After that hold the position for several deep belly breaths, in through your nose and out through your mouth.

13. Full Body Stretch
Lie on your back on the floor, while maintaining good alignment with your head, shoulders, hips, and legs. Then engage your core and bring your arms overhead, taking a big reach as you stretch your legs long. After that hold this position for several deep belly breaths, in through your nose and out through your mouth.

Repeat Knees to Chest
14. Side Fetal Pose
Lie on your side on the floor with your knees bent, while maintaining good alignment in your upper body. Then extend your bottom arm overhead and rest your head on your outstretched arm. While keeping your feet together and close your eyes. After that hold this position for several deep belly breaths, in through your nose and out through your mouth.

15. Seated Breaths
Begin in an upright sitting position on the floor with your legs crossed in front of your body. While maintaining good alignment of your head, shoulders, and hips. Then place your hands on your knees and close your eyes. After that hold this position for several deep belly breaths, in through your nose and out through your mouth.

Conclusion
It is important to note that yoga for muscle recovery is a practice that is tailored to each individual. It is essential to listen to your body and practice with caution if you are recovering from an injury or have any medical conditions. Furthermore, it is recommended to seek guidance from a certified yoga instructor before doing yoga for muscle recovery, especially if you are new to yoga or have any concerns.
In summary, yoga can be a great way to aid muscle recovery and reduce tension in the body. Practicing yoga poses for muscle recovery like those mentioned above can help stretch and loosen tight muscles and improve overall flexibility. Always listen to your body and practice with caution if you are recovering from an injury or have any medical conditions.