Relax and Restore: A Guide to Deep Muscle Stretching with Restorative Yoga
Restorative Yoga is a wonderful way to care for your body and mind. With a focus on relaxation, gentle stretches, and deep breathing, this practice allows you to release tension and stress while nurturing your muscles and joints. Restorative Yoga Poses is an excellent choice if you want to experience a deeper muscle stretch and gain a greater sense of calm and balance. Don’t worry if you’re new to yoga or haven’t practiced in a while; Restorative Yoga Poses is accessible to everyone, regardless of age, fitness level, or experience. So why not give it a try? Allow yourself to relax, let go, and experience the benefits of a deep, restorative muscle stretch today.
1. Supine Butterfly Pose
Lie on your back on the floor with your knees bent and feet flat on the floor. Then place one hand over the heart and the other on your belly, while relaxing your upper body. After that, tighten your core, bring the soles of your feet together, and open your knees out to the sides. After that, hold the position, count to 5 for the inhale and count to 7 for the exhale. For several deep belly breaths, in through your nose and out through your mouth.
Moreover, to make the practice easier, place a yoga block or pillow underneath your knees for support if needed.

2. Constructive Rest
Lie on your back with your knees bent and feet flat on the floor. Then place one hand on your chest and the other on your belly. Bring your heels out and your toes together, letting your knees fall inward. After that, relax your upper body, close your eyes, and take several deep belly breaths, in through your nose and out through your mouth.
You can utilize a pillow or a cushion to support your hips.

3. Knees to Chest
Lie on your back on the floor with your knees bent and your feet flat. Bring both knees up towards your chest and hold onto your knees with both arms, while looking for a light stretch in the lower back and glutes. If you can, gently rock from side to side or curl your upper body forward to bring your nose towards your knees. After that, hold this position for several deep belly breaths, in through your nose and out through your mouth. Relax and return to the starting position.
 |
 |
4. Happy Baby
Lie on your back with your knees bent and feet flat on the floor, while relaxing your upper body. After that, Lift your legs to bring your knees toward your shoulders and hold the outsides of your feet with your hands. Hold this position for several deep belly breaths, in through your nose and out through your mouth. Then relax and return to the starting position.
Moreover, tto intensify the stretch, pull your feet closer to your body or gently rock from side to side.
 Happy Baby
Variation 1
Lie on the floor with your knees bent, while relaxing your upper body. Lift your legs to bring your knees toward your shoulders and hold the outsides of your feet with your hands. After that, hold the position for a couple of seconds, then slowly move your body to the side as you stretch your one leg out. Return to the starting position and repeat the movement on the opposite side.
 |
 |
Variation 2
Lie on the floor with your knees bent, while relaxing your upper body. Lift your legs to bring your knees toward your shoulders and hold the outsides of your feet with your hands. After that, engage your abdominal muscles and extend your legs widely out to the sides. Then hold the position for several deep belly breaths, in through your nose and out through your mouth.

Repeat Knee to Chest
5. Figure 4
Lie on your back with your knees bent and your feet flat on the floor. After that, cross one ankle over your opposite knee. Hold your lower leg with both hands or wrap your hands around the front of your knee. Then pull your knee closer to your chest to intensify the stretch. Hold this position for several deep belly breaths, in through your nose and out through your mouth. To make the exercise easier, use a strap to pull your knee closer.
 |
 |
6. Spinal Twist
From the Figure 4 position, wrap your top leg fully around your lower leg. After that, extend your arms out to the sides, relaxing your upper body. Engage your core. Twist through the lower back, pelvis, and spine to bring both knees to one side as you turn to look in the opposite direction. To intensify the stretch, lower your upper knee towards the floor. Then hold the position for several deep belly breaths, in through your nose and out through your mouth. Relax and return to the starting position. After that, repeat the movement on the opposite side. To make the practice easier, stack your knees over the other or place a pillow between your knees for support if needed.

7. Progressive Exercises 1
a. Child’s Pose
Begin in a 4-point position with your hands under your shoulders and your knees under your hips, wider than hip-width apart. Engage your core. Shift your hips back to your feet as you extend your arms overhead or wrap your arms around the outside of your knees with your palms facing upward. Then, rest your chin or forehead to the floor and relax your mid-back area for a light stretch. Hold this position for several deep belly breaths, in through your nose and out through your mouth. To make the practice easier, use a pillow or bolster to support your upper body if needed.

b. Thread the Needle
From the Child’s Pose position, rotate your upper body upward and extend one arm towards the ceiling. After that, engage your core, rotate back, and slide the same arm under your body with your palm facing upward, lowering your shoulder to the floor. Rest the side of your head on the floor and wrap your other arm behind your back. Then, hold this position for several deep belly breaths, in through your nose and out through your mouth. Return to the starting position and repeat the movement on the opposite side. To make this practice easier, rest the side of your head on a bolster or pillow for support.
 |
 |
 |
8. Progressive Exercises 2
a. Camel Stretch
Begin in an upright kneeling position on the floor with your knees shoulder-width apart, while maintaining good alignment in your upper body. After that, place your hands on your hips and step one foot out to the side with your toes pointing sideways. Tighten your abdominal area. Bend your knee and lean your body weight to the side or shift your hips forward and back. Then, repeat the movement. After several repetitions, repeat the movement on the opposite side. To intensify the stretch, straighten your front leg and lower your seat towards your back heel.
 |
 |
b. Half Camel Pose/ Ardha Ustrasana
Begin in an upright kneeling position on the floor with your knees shoulder-width apart, while maintaining good alignment in your upper body. After that, place your hands on your hips and step one foot out to the side with your toes pointing sideways. Engage your core and bring your right hand on your right shin as you bend your upper body backward, opening your chest towards the sky, with your left arm reaching overhead. Then, hold the position for several deep belly breaths, in through your nose and out through your mouth. You can utilize a belt, a band, or a yoga block for support if you cannot reach your shin.
 |
 |
 |
Variation 1
Begin in an upright kneeling position on the floor with your knees shoulder-width apart, while maintaining good alignment in your upper body. After that, place your hands on your hips and step one foot out to the side with your toes pointing sideways. Engage your core and bring your left hand on your right shin as you bend your upper body backward, opening your chest towards the sky, with your right arm reaching overhead. Then, hold the position for several deep belly breaths, in through your nose and out through your mouth You can utilize a belt, a band, or a yoga block for support if you cannot reach your shin.
 |
 |
 |
9. Progressive Exercises 3
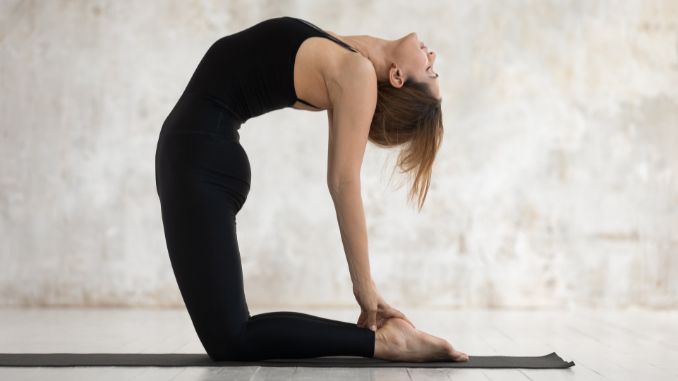
a. Camel Pose
Begin in an upright kneeling position on the floor with your knees shoulder-width apart. After that, tighten your abdominal area and interlace your fingers behind your back. Push your hips forward so that your hips are aligned with your knees as you slowly drop your head back. Hold in this position for a few belly breaths, in through your nose and out through your mouth. Then, relax and raise back up to the starting position. To make the practice easier, place your hands on your lower back or upper pelvis area.
 |
 |
Variation 1
Begin in an upright kneeling position, while maintaining good alignment with your head, shoulders, hips, and knees. After that, lean your upper body back, look up, and plant your hands on your heels. Push your hips forward so that your hips are aligned with your knees. Then, hold this position for several deep belly breaths, in through your nose and out through your mouth. Relax and return to the starting position.
 |
 |
Variation 2
Begin in an upright kneeling position, while maintaining good alignment with your head, shoulders, hips, and knees. After that, clasp your hands together in front of your body, then extend both arms overhead, while interlacing your fingers with both index fingers pointing toward the ceiling. Engage your core. Slowly push your hips forward as you bend your upper body back, opening your chest towards the sky. After that, hold the position for several deep belly breaths, in through your nose and out through your mouth.
 |
 |
 |
Note: If the succeeding 2 exercises are challenging for you, you can skip them and move on to Shoulder Stretch.
b. Advance Camel Pose
From the end position of Variation 2, bend your upper body further back down as you plant your hands with your palms pressed firmly on the floor. Then, hold the position for several deep belly breaths, in through your nose and out through your mouth.
 |
 |
c. Shoulder Stretch
Begin in an upright kneeling position on the floor with your knees wider than shoulder-width apart and your feet together. While maintaining good alignment with your head, shoulders, and hips. Place your hands on your thighs, pushing your lower body further down as you lengthen your spine. Then, engage your core and twist to bring your left shoulder forward. Repeat the movement on the opposite side.
 |
 |
10. Progressive Exercises 4
a. Hero Pose/ Virasana
Begin in an upright kneeling position, while maintaining good alignment with your head, shoulders, hips, and knees. Widen your feet apart as you rest your seat on the floor. Then, contract your core and hold this position for several deep belly breaths, in through your nose and out through your mouth. To make the practice easier, use a pillow or bolster to support your lower body in a sitting position.

b. Recline Hero Pose
From the Virasana (Hero Pose), then engage your core, lean your upper body back, and plant your hands on the floor behind you for support. Then, drop your head backward as low as possible, then close your eyes. After that, hold this position for several deep belly breaths, in through your nose and out through your mouth. If you feel pain in this movement, immediately get up and stop. But if this pose is too easy for you, you can proceed with Supta Vajrasana (Sleeping Thunderbolt Pose)
 |
 |
c. Supta Vajrasana (Sleeping Thunderbolt Pose)
From the Recline Hero Pose. After that, engage your core. Lower your upper body all the way down on the floor. You can place your thumbs on the soles of your feet to stimulate blood flow or place your arms overhead and take several deep belly breaths, in through your nose and out through your mouth. Then, if you feel pain in this movement, immediately get up and stop.
 |
 |
 |
11. Progressive Exercises 5
a. Reverse Corpse with Ear to Mat
Lie on your belly, while maintaining good alignment with your head, shoulders, hips, and legs. Then bring your arms to your sides and turn your head sideways, pressing your ear to the mat. Relax your neck, belly, glutes, and legs. After that, allow your heels to soften to the sides. After that, old the position for several deep belly breaths through your nose and out through your mouth. Turn your head to the opposite side.

b. Baby Cobra Pose (Bhujangasana)
From the Reverse Corpse with Ear to Mat position, while contracting your abdominal muscles and lift your mid-back off the floor using your hands as support. Then, hold this position for several deep belly breaths, in through your nose and out through your mouth.

c. Upward Dog
From the Baby Cobra pose. Breathe in, then press to straighten your arms as you arch your back, while opening your chest and lifting your hips and knees off the floor. After that, hold this restorative yoga poses position for several deep belly breaths, in through your nose and out through your mouth.

d. Downward Dog
From the Upward Dog position. After that, tighten your abdominal muscles and push back with your arms straightening your legs as you lift your hips. Then, hold this restorative yoga poses position for several deep belly breaths in through your nose and out through your mouth.

e. Downward-Facing Dog with Hamstring Stretch
From the Downward Dog position. After that, tighten your abdominal muscles, then bend one knee to lift your heel off the floor, keeping your other leg straight. After that, return to the restorative yoga poses starting position and repeat the movement on the opposite leg, while alternating sides with 5 repetitions on each side.
 |
 |
12. Prayer Pose
Begin in an upright kneeling position on the floor with your knees and feet together. While maintaining good alignment of your head, shoulders, and hips. Then, engage your core and bring your hands together in front of your chest. After that, hold this restorative yoga poses position for several deep belly breaths, in through your nose and out through your mouth.

Deep muscle stretching with restorative yoga poses can profoundly impact your physical and mental well-being. By caring for your body and mind through this gentle practice, you can release tension, while increasing flexibility, and find a greater sense of calm and balance. Why not make restorative yoga a regular part of your self-care routine? With consistent practice, you’ll feel better in your body and cultivate a deeper connection to yourself and the world around you. Remember, every step you take towards a healthier, happier you with restorative yoga poses is a step in the right direction.
