
Stretching with Yoga
Yoga can be a great way to improve flexibility, strength, and balance. Stretching is especially important for people with tight muscles and poor flexibility because it can help bring blood flow to your muscles and increase your range of motion. In addition, stretching can help relieve stress, improve concentration, and reduce tension. There are many different types of yoga that you can try. All types of yoga focus on improving flexibility, strength, and balance through gentle movements intended to stretch, relax and energize the body.
When it comes to increasing flexibility safely and effectively, few practices can compete with yoga. It’s not just the postures that have benefits; the poses are also a great way to add in some stretching and mobility work. Luckily, there are even more benefits from adding in some stretches at the end of your yoga practice. Stretching after a yoga session helps your body cool down, speeds up recovery time, and eases out any tightness you may have picked up during your session. Improving flexibility isn’t as scary as it sounds. Even if you don’t think you’re very flexible right now, you can improve with the right training. The best thing about adding in some simple stretching exercises to your yoga routine is that you don’t need any special equipment or knowledge to do them—just follow along with these simple tips!
Yoga To Stretch Your Body
The first thing to remember when you’re stretching is that your muscles will only get longer if you force them beyond their natural range of motion. A better goal is to increase the amount of space between the fibers and the connective tissues of the muscles. Fortunately, yoga is ideal for bringing this about because it uses both passive and active movements. Passive movements are held for a few seconds, letting your body naturally stretch the connective tissues, while active movements involve conscious manipulation of the muscles to stretch them better. Passive stretching should be done before you do any active stretching, such as yoga postures. While active stretching is a great way to increase blood flow and prepare your body for the day, passive stretching is designed to relax your muscles and connective tissues after a workout.
1. Breaths
First, begin in an upright sitting position on a bolster with your legs crossed, while maintaining good alignment with your head, shoulders, and hips. Secondly, place your hands on your thighs. And then close your eyes and take several deep belly breaths, in through your nose and out through your mouth.

Breaths - Stretching with Yoga
2. Progressive Exercise- Neck Stretch
a. Side Neck Stretch
First, begin in an upright sitting position on a bolster with your legs crossed, while maintaining good alignment with your head, shoulders, and hips. Then, place your hands on your thighs. Engage your core, raise one arm upward, and place it above your head. Looking for a light stretch along the side of the neck, drop one ear towards your shoulder. Then hold the position for several deep belly breaths, in through your nose and out through your mouth.
 |
 |
 |
Side Neck Stretch
b. Side Neck Stretch with Chin Tuck
First, begin in an upright sitting position on a bolster with your legs crossed, while maintaining good alignment with your head, shoulders, and hips. Secondly, place your hands on your thighs. After that, engage your core, raise one arm upward, and place it above your head. Looking for a light stretch along the side of the neck, slightly bend your head, tucking your chin down. Lastly, hold the position for several deep belly breaths, in through your nose and out through your mouth.
 |
 |
Side Neck Stretch with Chin Tuck
Repeat the sequence of movement on the opposite side
3. Seated Spinal Twist
First, begin in an upright sitting position with your legs crossed, while maintaining good alignment with your head, shoulders, and hips. Second, engage your core and raise both arms. Then, lower both arms and place one hand on your opposite knee. After that, twist your upper body to one side, reaching back with your other hand for a light stretch. Take a couple of deep belly breaths, in through your nose and out through your mouth. After that, return to the starting position and repeat the movement on the opposite side.
 |
 |
Seated Spinal Twist - Stretching with Yoga
4. Wrist Circles
First, begin in an upright kneeling position with your knees and feet close together, while maintaining good alignment with your head, shoulders, and hips. Shift your hips back to rest your seat on your feet. After that, raise both hands at chest height. Lastly, close your palms and move your wrist in a small circular movement.
 |
 |
 |
Wrist Circles - Stretching with Yoga
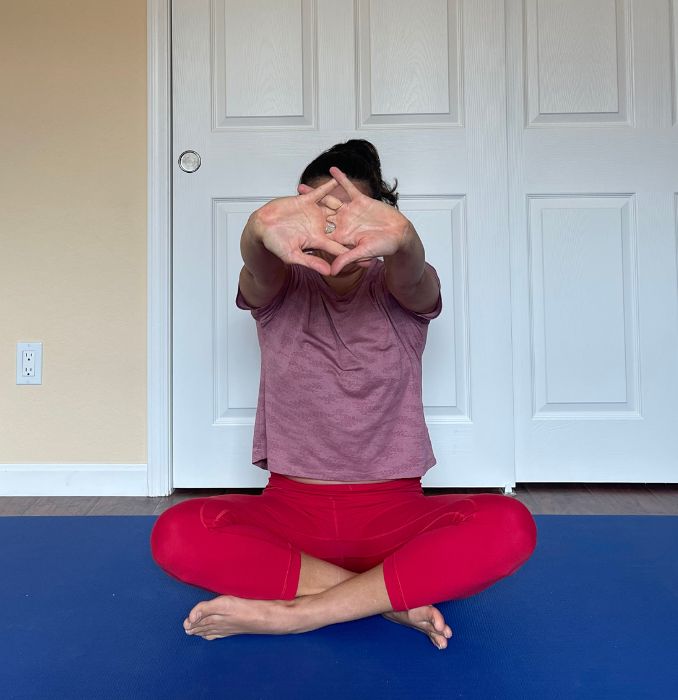
5. Arms Stretch
Begin in an upright kneeling position with your knees, and feet close together, while maintaining good alignment with your head, shoulders, and hips. Shift your hips back to rest your seat on your feet. After that, engage your core and raise your arms at chest height, interlace your fingers together with palms facing in front. Then, bring your arms overhead, and raise your chin upward for a stretch. Then hold the position for several deep belly breaths, in through your nose and out through your mouth.
|
 |
Arms Stretch - Stretching with Yoga
6. Arm Circles
Begin in an upright kneeling position with your knees, and feet close together, while maintaining good alignment with your head, shoulders, and hips. Then, shift your hips back to rest your seat on your feet. After that, engage your core, raise your arms upward, and move your arms in a big circular movement. Repeat the movement in an alternating direction.
 |
 |
 |
Arm Circles - Stretching with Yoga
7. Cat-Cow
Begin in a 4-point position with your hands beneath your shoulders and your knees under your hips. Contract your abdominal area. Slowly round your mid back as you lower your head downward. Then, alternate by lifting your head and arching your mid back. Repeat the sequence of movements. Complete 5 repetitions.
You can move your body from side to side or in a circular movement to intensify the movement.
 |
 |
Cat-Cow - Stretching with Yoga
Variation 1. Cat-Cow
Begin in a 4-point position with your hands beneath your shoulders and your knees under your hips. Move your hands with your fingers facing towards you. Contract your abdominal area. Slowly lift your head and arch your mid back. Then alternate by rounding out your mid back as you drop your head downward. Repeat the movement, alternating directions. Complete 5 repetitions.
 |
 |
Variation 1 - Cat-Cow
8. Disco Cow (Barrel Roll)
Begin in a 4-point position with your hands beneath your shoulders and your knees under your hips. Then, contract your abdominal area. After that, slowly move your torso in a circular movement, Find the movement pattern that allows you to release tension in your back and shoulders. Lastly, roll around for several deep belly breaths. Repeat the movement on the opposite direction.
 |
 |
Disco Cow (Barrel Roll)
9. Downward Dog Flow
a. Downward Dog with Knee Bend
Begin in a 4-point position with your hands beneath your shoulders and your knees under your hips. Then, tighten your abdominal muscles and push back with your arms, straightening your legs as you lift your hips. Bend one knee to lift your heel off the floor, keeping your other leg straight. Lastly, lower your heel to the floor and repeat the movement on the opposite side. Repeat the movement.
 |
 |
Downward Dog with Knee Bend
b. Downward Dog with Knee Drop
From the downward dog position. First, engage your core and lift both heels up looking for a light stretch on your heels and legs, then lower your heels down returning to the starting position and slowly bend both knees down just slightly above the floor and push back with your arms, straightening your legs as you lift your hips, returning to the starting position. Repeat the sequence of movements. Start with 1 set of 2 repetition.
 |
 |
 |
 |
Downward Dog with Knee Drop
c. Downward Dog with Leg Lifts
From the downward dog position. Engage your core and lift one leg towards the ceiling. Then hold the position for a couple of seconds and slowly bend your leg down, with your toes pointing towards your seat. After holding the position for a couple of seconds, relax and repeat the movement on the opposite side.
To intensify the exercise, move the lifted leg into a circular movement.
 |
 |
 |
Downward Dog with Leg Lifts
10. Thread the Needle
Begin in an upright kneeling position with your knees wider than shoulder-width apart. Tighten your abdominal area. Shift your hips back to your feet and extend your arms in front. Contract your abdominal area, straighten one arm upwards, and then reach your other arm under your body. Place the opposite arm at your back. Then hold the position for several deep belly breaths, in through your nose and out through your mouth. Relax and repeat the movement on the opposite side.
 |
 |
 |
 |
Thread the Needle
11. Modified Downward Dog
Begin in an upright kneeling position with your knees wider than shoulder-width apart. Tighten your abdominal area. After that, shift your hips back to your feet and extend your arms in front. Then, contract your abdominal area and lift your hips upwards as you lower your upper body towards the floor. Lastly, hold the position for several deep belly breaths, in through your nose and out through your mouth.
 |
 |
Modified Downward Dog
12. Sphinx Pose
Lie on your stomach with your feet shoulder-width apart, while maintaining good alignment with your head, shoulders, hips, and legs. Then, plant your hands on the floor at your sides with your elbows beneath your shoulders. After that, spread your fingers wide for a good base of support. Arch your back using your glutes and back muscle strength. Gently press your elbows into the mat directly under your shoulders. Inhale and slowly pull yourself forward, keeping your hips anchored into the mat. Lastly, Hold this position for several deep belly breaths, in through your nose and out through your mouth. Relax and return to the starting position.

Sphinx Pose - Stretching with Yoga
13. Upward Dog or Cobra
Move into a straight-arm plank position, while maintaining good alignment with your head, shoulders, hips, and toes. Then, lower your hips to the ground, arching through your back to stretch the hips and low back area. Hold this position for a couple of seconds. Lastly, take a deep belly breath through your nose and out through your mouth. Relax and return to the starting position.

Upward Dog or Cobra
14. Lying in Side Stretch
First, lie on your stomach with your feet shoulder-width apart, while maintaining good alignment with your head, shoulders, hips, and legs. Secondly, plant your hands on the floor at your sides with your elbows beneath your shoulders. Thirdly, spread your fingers wide for a good base of support. Tighten your abdominal area and bend one knee with your toes pointing upwards. Then slowly move your body to the side as you bring your foot at the back of your straight leg. Place one hand in front of your chest for support. Lastly, hold the position for several deep belly breaths, in through your nose and out through your mouth. Relax and repeat the movement on the opposite side.
 |
 |
Lying in Side Stretch
15. Child’s Pose
First, begin in an upright kneeling position on the floor with your knees wider than shoulder-width apart. After that, tighten your abdominal area. Then, shift your hips back to your feet and extend your arms in front. Drop your forehead on the floor, relaxing your mid-back area for a light stretch. Take a couple of deep belly breaths in through your nose and out through your mouth. Hold this position for 10 seconds. After that, return to the starting position

Child’s Pose Stretching with Yoga
16. Knee Back Stretch
Begin in an upright kneeling position, while maintaining good alignment with your upper body. Place your hand on your back. After that, engage your core and slowly arch your mid back, bringing both hands towards your ankles, looking for a light stretch at your back. Then hold the position for several deep belly breaths, in through your nose and out through your mouth. Relax and repeat the movement.

|
 |
Knee Back Stretch
17. Candle Stick to Plow Pose
Lie on your back with your knees bent and feet flat on the floor. Place your hands on your side, relaxing your upper body. Tighten your core, slightly bend your knees, and raise both legs upward. Then bring both legs over your head with your toes pressed on the floor Then hold the position for a couple of seconds. After that, return to the starting position and bring both legs down.
 |
 |
 |
Candle Stick to Plow Pose
18. Knees to Chest
Lie on your back on the floor with your legs straight. Bring both knees to your chest and hold onto your knees with both arms, looking for a light stretch in the lower back and glutes. Close your eyes and take several deep belly breaths, in through your nose and out through your mouth. Relax and return to the starting position.
You can move your knees from side to side to intensify the movement.
 |
 |
Knees to Chest
19. Happy Baby
Lie on your back with your knees bent and your feet flat on the floor. Bring your bend knees closer to your chest and hold your feet with both hands to intensify the stretch. Hold this position for a couple of seconds and bring one knee down towards the floor while still holding your toe. Repeat the movement alternately on the opposite side. Complete 5 repetitions
To intensify the movement, you can spread both legs to the sides while still holding on to your toes. Hold the position for a couple of seconds.
 |
 |
20. Lying Breaths
Lie on your back with your knees bent and feet flat on the bed. Place your hands on your belly. And then close your eyes and take several deep belly breaths, in through your nose and out through your mouth

Lying Breaths - Stretching with Yoga
21. Butterfly Pose
Lie on your back with your knees bent and feet flat on the floor. Rest your arms at your sides or place your hands on your stomach. Bring the soles of your feet together. Tighten your core and open your knees out to the sides. Take several deep belly breaths, in through your nose and out through your mouth.

Butterfly Pose - Stretching with Yoga
22. Good Mornings
Lie on your back on the floor, while maintaining good alignment with your head, shoulders, hips, and legs. Engage your core and bring your arms overhead as you stretch your legs long. Hold this position for a few seconds. Relax and return to the starting position.
 |
 |
Good Mornings - Stretching with Yoga
Stretching is a key component of any workout routine. It can help increase flexibility, decrease joint soreness, and reduce muscle tension. Stretching should be done before, during, and after exercise to prevent injury and improve performance. While there are many yoga poses, the most important thing to remember is that every stretch should be held for at least 10 seconds and repeated five times. Also, check with your doctor before starting any new physical activity.
Conclusion
When you’re done with yoga, don’t forget to do some stretching! Active stretches, like yoga postures, are great for warming up your muscles to help them relax and reduce any soreness, but passive stretches are important too. Stretching after a yoga session helps your body cool down, speeds up recovery time, and eases any tightness you may have picked up during your session. Stretching is great for improving flexibility, but it’s also a great way to relax and destress! Take time as you stretch, focus on breathing, and enjoy relaxation.
