De-bloating Yoga
If you’re looking for a way to de-bloat and feel energized, De-bloating Yoga is the perfect practice!
De-bloating yoga is an ancient practice that is becoming increasingly popular today. This form of yoga is designed to counteract the negative effects of bloating, such as abdominal discomfort, abdominal distention, and fatigue. With its gentle poses and deep breathing, de-bloating yoga has been proven to help reduce bloating and improve overall well-being.
In addition to its physical benefits, this practice can also help reduce stress and anxiety, as it is a form of mindful movement that encourages relaxation. Through simple and accessible postures, de-bloating yoga can help to reduce discomfort and improve digestion and overall health.
Not to mention, mindful breathing and relaxation practices will help you stay present and grounded. So, whether you want to improve your physical health or simply relax, de-bloating yoga is a great way to do both.
Warm-Up
Breaths
Begin in an upright sitting position on the floor with your legs crossed in front of your body. Maintain good alignment with your head, shoulders, and hips. Place your hands on your knees. Close your eyes and take several deep belly breaths, in through your nose and out through your mouth.

Lotus Pose/Breaths
Begin in an upright sitting position on the floor with your legs crossed in front of your body. Lift your right shin and tuck it into your left hip crease. Maintain good alignment with your head, shoulders, and hips. Place your hands on your knees. Close your eyes and take several deep belly breaths, in through your nose and out through your nose. Notice the parts of your body that have tension, feel uncomfortable or tight, or feel pressure. Check if your belly is tired or stressed. If you notice a tight spot on your body, take a deep breath toward it. Start with 1 set of 5 repetitions.
Routines
1. Progressive Exercises 1:
a. Eagle Arms Forward Bend
For this exercise, start crossing your left arm over your right arm.
Begin in an upright sitting position on the floor with your legs crossed in front of your body. Then, lift your right shin and tuck it into your left hip crease, maintaining good alignment with your head, shoulders, and hips. and cross your left arm over your right arm in front of your body at shoulder height, wrapping at the elbows and wrists. Inhale as you bring your arms up, drop your head back, exhale, and slowly hinge through your hips to bend your upper body forward. Afterward, repeat the sequence of movements with 5 repetitions.
 |
 |
 |
b. Sukhasana Cactus Arms
At this point, unwrap your arms, engage your core, and bend your elbow to the side into a cactus pose as you open your chest by arching your back. Then, hold the position for several deep belly breaths through your nose and out through your mouth.
 Repeat Eagle Arms Forward Bend (at this time, cross your right arm over your left arm) and Sukhasana Cactus Arms
c. Seated Spinal Twist
From the Sukhasana Cactus Arms position, lower your arms and place your right hand on your side as you place your left hand on your right knee. Then, contract your core and twist your upper body to the right. Afterward, Extend your spine nice and tall and hold this position for several deep belly breaths, in through your nose and out through your mouth. Lastly, return to the neutral position and repeat the movement on the opposite side.
To intensify this movement, gaze as much as your body allows toward your back.
 |
 |
d. Cross-Legged Forward Bend
From the end position of the Seated Spinal Twist, return to the neutral position and engage your core. Then, raise your arms towards the sky, hinge from your hips to bend your upper body forward, extend your arms in front of your body, and plant your hands on the floor. Afterward, gently lower your head, relaxing your mid-back area for a light stretch. Then, take several deep belly breaths, in through your nose and out through your mouth. Return to the starting position.

2. Windshield Wipers
Begin in an upright sitting position on the floor with your knees bent and your feet flat, maintaining good alignment with your head, shoulders, and hips. Engage your core, widen your foot stance, and take a deep belly breath. Afterward, exhale as you slowly rotate your lower body to lower both knees, dropping them from side to side. Lastly, repeat the sequence of movements for several repetitions.
|
 |
3. Progressive Exercises 2:
a. Cat-Cow
Begin in a 4-point position with your hands beneath your shoulders and your knees under your hips. Then, move your left leg out and plant your left foot to the side. Afterward, contract your abdominal area. Slowly lift your head, lift your chin towards the ceiling, and arch your mid-back. Then, alternate by slowly rounding out your mid-back as you lower your head downward. Repeat the sequence of movements.

|
 |
 |
b. Puppy Pose
From the end position of Cat-Cow, Slowly walk your hands forward and gently lower your chest to the floor, sliding your arms overhead, keeping your hips up. Then, hold this position for several deep belly breaths, in through your nose and out through your mouth. Lastly, relax and return to the starting position.
 |
 |
Repeat Cat-Cow and Puppy Pose (with your opposite leg)
c. Downward-Facing Dog with Hamstring Stretch
From the end position of Puppy Pose, return to a 4-point position with your hands under your shoulders and knees under your hips, wider than hip-width apart. Then, tighten your abdominal muscles and push back with your arms, straightening your legs as you lift your hips. Afterward, bend one knee to lift your heel off the floor, keeping your other leg straight. Lastly, lower your heel back down and alternately repeat the movement on each side.
 |
 |
|
d. Downward-Facing Dog with Toe Raises
At this point, lower both heels down to the floor, keeping your spine straight and your gaze towards your feet. Then, engage your core and raise your toes. Lastly, hold the position for a couple of seconds, then return to the starting position. Repeat the movement with 3 repetitions.
 |
 |
Repeat Downward-Facing Dog with Hamstring Stretch
e. Forward Fold
From the Downward-Facing Dog with Hamstring Stretch, Slowly walk your hands forward, moving into a Forward fold position. Afterward, lower your arms to the floor. Then, slightly bend your knees and lower your upper body with your head closer to your knees. Wrap your arms around your legs. Lastly, hold the position for several deep belly breaths, in through your nose and out through your mouth.
Move your head from side to side to make the exercise more challenging.
 |
 |
f. Halfway Lift or Ardha Uttanasana
From the Forward Fold position, slowly unwrap your arms from your legs and move into a Halfway lift position. Then, lower your arms to the floor with your hands reaching down, or place your hand on your knees or your shin. Keep your spine straight and your gaze forward. Lastly, Hold this position for several deep belly breaths, in through your nose and out through your mouth.
 Repeat Forward Fold and Half Lift or Ardha Uttanasana 5x
g. Forward Bend Heart Opener
From the Forward Fold position, Place your hands behind your back and interlace your fingers. Afterward, engage your core and straighten your legs as you lift your joined hands away from your body, keeping your gaze down to the floor. Then, hold this position for several deep belly breaths, in through your nose and out through your mouth. Lastly, relax and return to the starting position.
To intensify the movement, you can lower your head to move your arms upward away from your back for a deeper stretch and rock your head from side to side.
 |
 |
 |
h. Tadasana
Lower your arms and slowly raise your upper body into an upward standing position from the Forward Bend Heart Opener position. Place your arms at your sides with your palms facing up and lift both arms overhead. Hold the position for several deep belly breaths, in through your nose and out through your mouth.
 Repeat Halfway Lift or Ardha Uttanasana
4. Progressive Exercises 3:
a. Chaturanga Dandasana
From the Halfway Lift or Ardha Uttanasana position. Slightly bend your knees, step back with both knees, and bend your arms as you lower your upper body toward the floor. Keep your upper body parallel with your elbows straight up. Hold this position for several deep belly breaths, in through your nose and out through your mouth.
 |
 |
 |
b. Baby Cobra
At this point. Bend your knees to the floor into a tabletop position, then bend your arms as you lower your upper body toward the floor. Keep your upper body parallel with your elbows bent. Slightly lift your upper back off the floor using your hands as support. Hold this position for several deep bellies.
 |
 |
 |
c. Three-Legged Downward-Facing Dog with Hip Opener
(For this exercise, start with your left leg)
From the Baby Cobra position. Curl your toes as you push back with your arms, and straighten your legs as you lift your hips into a downward dog position. Then, extend your left leg up towards the sky, and the opposite foot is planted on the floor. Then, bend the top knee stacking your hips. Keep your hips and shoulders pointing forward to square your hips. Afterward, lower your forehead towards the floor while keeping your gaze toward the back. Lastly, hold the position for several deep belly breaths, in through your nose and out through your mouth.
 |
 |
d. Supported Crescent Lunge
From the end position of Three-Legged Downward-Facing Dog with Hip Opener, slowly drive your left leg towards your chest and plant it down between your hands, drop the back knee and reach the arms up towards the sky, while keeping your gaze up and your toes pointed straight ahead. Then, hold the position for several deep belly breaths, in through your nose and out through your mouth.
To intensify this movement, slowly drop your hips down as much as your body allows.
 |
 |
 |
e. Lunge with Heart Opener
From the end position of the Supported Crescent Lunge, drop your arms and place it behind your back, then interlace your fingers. Then, engage your core. Inhale, slightly lean your upper body back to open your heart. Afterward, exhale as you hinge through your hips to bend your upper body forward while pushing the joined hands away from the lower back. Lastly, hold the position for several deep belly breaths, in through your nose and out through your mouth.
You can place a chair below your bent knee to make the pose easier.
 |
 |
Repeat Supported Crescent Lunge
f. Dragonfly Twists
Variation 1
From the Supported Crescent Lunge's end position, lower your arms and plant your right hand on the floor. Then, engage your core and rotate your body to face the left side as you reach your left arm overhead and gaze towards the sky. Then lift your right knee to straighten your leg and tuck your toes under. Lastly, hold this position for several deep belly breaths, in through your nose and out through your mouth.
You can place your raised arm behind your back to intensify this movement.
 |
 |
Variation 2
At this point, Shift your weight to the outer edges of both feet, then lower your right hip down to the floor as you bend your left knee towards the left side. Then, twist your upper body to move with your left arm as if trying to reach the back of your mat with your gaze toward your left hand. Return to the starting position and repeat the sequence of movements with 5 repetitions.
 |
 |
Repeat Variation 1
5. Garland Pose (Malasana)
From the Dragonfly Twist- Variation 1 position. Lower your left arm and take a big step forward with your extended leg to come up in a standing position. First, hinge through your hips to lower your seat into a squatting position as far as your body will allow. Then, engage your core and bring your arms to your heart center with palms pressed together. Afterward, close your eyes and hold this position for several deep belly breaths, in through your nose and out through your mouth.
 Repeat the following sequence of exercises:
- Halfway Lift or Ardha Uttanasana,
- Forward Fold,
- Tadasana
- Halfway Lift or Ardha Uttanasana
- Forward Fold
- Chaturanga Dandasana
- Baby Cobra
6. Upward Dog
From a Baby Cobra position, lift your head and arch through your back to stretch the hips and lower back area. Then, lift your chin towards the ceiling and hold this position for several deep belly breaths, through your nose and out through your mouth.
Repeat the following sequence of exercises (start with your right leg)
- Three-Legged Downward-Facing Dog with Hip Opened
- Supported Crescent Lunge
- Lunge with Heart Opener
- Dragonfly Twist (Variation 1 and Variation 2)
7. Triangle Pose
From the DragonTwist position. Firstly, drop your back heel and Extend your front leg to lift your hip upwards. Then, Pivot one foot so that your toes are pointing out to the side. Bend your upper body over your pivoted foot and press your hand on the floor. Contract your core and reach upward with your opposite arm, opening the front of your body with your gaze towards the sky. Hold this position for several deep belly breaths, in through your nose and out through your mouth. Relax and return to the starting position.
 |
 |
Repeat Garland Pose (Malasana)
6. Knee Chest
Lie on your back with your knees bent and your feet flat on the floor. Lift both knees towards your chest and hold onto your knees with both arms. Look for a light stretch in your lower back, hips, and glutes. Gently rock your knees from side to side several times. Pull your nose toward your knees. Relax and return to the starting position.

7. Happy Baby
Lie on your back with your knees bent and your feet flat on the floor, shoulder-width apart. Engage your core. Bring your knees to your chest and hold onto your big toes with each hand. Pull your knees closer to your chest and rock your hips from side to side several times. You can either alternately pull one leg out to the side or both at the same time. Relax and return to the starting position.
 |
 |
8. Candlestick
Lie on your back with your knees bent and feet flat on the floor. Place your hands on your side, relaxing your upper body. Tighten your core and raise both legs upward at a 90-degree angle. Hold the position for several deep belly breaths, in through your nose and out through your mouth.

9. Fish Pose
Firstly, lie on your back on the floor, maintaining good alignment with your head, shoulders, hips, and legs. Secondly, place your arms at your sides, palms down. Then, engage your core and press your forearms and elbows into the floor to lift your chest, creating an arch in your upper back. Afterward, lift your shoulder blades and upper torso off the floor. Tilt your head backward and bring the crown of your head to the floor. Then, keep your lower body on the ground with your legs and hips pressed firmly into the floor. Lastly, Hold the position for several deep belly breaths, in through your nose and out through your mouth.
 |
 |
Repeat Knee to Chest
10. Spinal Twist
Variation 1
First, lie on your back with your knees bent and your feet flat on the floor. Then, extend your arms at your sides, maintaining good alignment with your head, shoulders, and hips. Afterward, engage your core, cross your right leg over your left leg, then twist through your lower back pelvis and lower your knees to the left. You can either extend your arms into a T position and gaze to the right or hold one knee with one hand and gaze towards the ceiling. Lastly, hold this position for 10 deep belly breaths, in through your nose and out through your mouth. Return to the starting position and repeat the movement on the opposite side.

Variation 2
First, lie on your back with your knees bent and your feet flat on the floor. Then, extend your arms at your sides, maintaining good alignment with your head, shoulders, and hips. Afterward, engage your core, then move your hips to the right. Twist your low back and lower your knees to the left side. Then, extend your arms out into a T position and gaze to the right. Lastly, hold this position for 10 deep belly breaths, in through your nose and out through your mouth. Return to the starting position and repeat the movement on the opposite side.

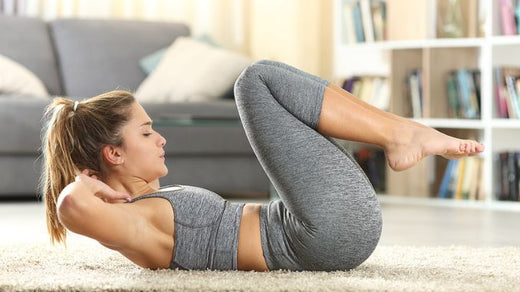
11. Curling Up and Down
First, lie on your back with your knees bent and feet flat on the floor. Then, tighten your core, slightly bend your knees, and raise both legs upward. Place your hand at the back of your knees for support. Lastly, engage your core and, using your body’s momentum, raise your body into a sitting position, then move back down into the starting position. Repeat the sequence of movement. Complete 2-3 repetitions.
 |
 |
12. Wim Hof Breathing
Begin in an upright sitting position with your legs crossed, or find a comfortable position and maintain good alignment with your head, shoulders, and hips. Then, engage your core and breathe deeply through the nose and belly. Exhale, then immediately breathe in again. Afterward, take 30-40 breaths. Hold your breath until getting the urge to breathe again. Lastly, inhale deeply and hold for 15 seconds. Repeat 4-5 times.

One of the best parts about de-bloating yoga is that it can be practiced at home! And the great part is that it doesn’t require any special equipment. You can get started immediately with the right yoga mat and a few simple props. To help you get started, here are some simple things to remember as you practice de-bloating yoga.
- This yoga practice can be practiced anywhere. Make sure you have a yoga mat and props handy, whether at home, at work, on vacation, or anywhere else in between.
- Be sure to check in with your body throughout the practice. If you notice tightness or pain in your muscles or joints, stop doing this pose and make adjustments. If your breathing becomes too shallow or irregular, stop the exercise and try again.
- After you have practiced for a while, add more poses and movements to your routine. This way, your practice will evolve as you progress.
Follow these simple steps to start your journey to reduce abdominal bloating, improve digestive health, and provide stress relief.