Gentle Yin Yoga: Yoga to Relax the Nervous System
Are you looking for an exercise to help you relax, soothe your body and mind, and reduce stress? Gentle Yin Yoga may be ideal for you. Yin yoga is a slow, meditative style that provides the body and nervous system with deep release and relaxation. It is also a practice that focuses on maintaining postures for several minutes, aiming to improve flexibility, release tension, and balance out energy flow. Through this practice, you are able to access inner stillness and a sense of presence.
Gentle Yin Yoga can be practiced by anyone, regardless of their physical condition or experience with yoga, as the postures can be modified to suit your needs. As you practice long-held postures, your body can slowly unwind and open up, allowing a sense of calmness and peace to fill your body and mind. So, come and explore the healing and calming effects of Gentle Yin Yoga.
Warm Up: Gentle Yin Yoga
Breaths
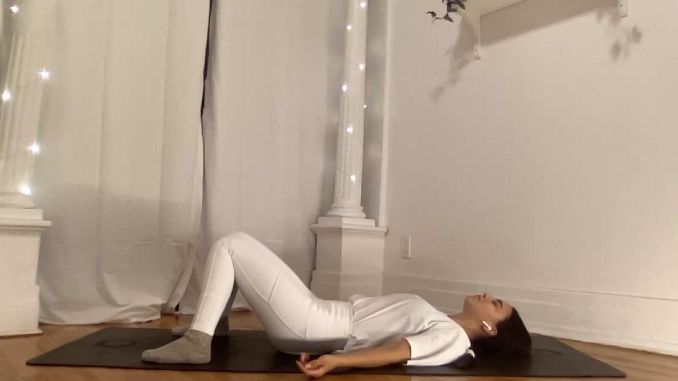
Lie on your back on the floor with your knees bent and your feet hip-width apart. Bring your toes inward and your heels outward, like a duck’s, then bring your knees together. Relax your body and place your hands either on your side with your palms facing up or one hand on your chest and the other on your belly. Then bring your awareness to your breath. Relax your forehead, unclench your jaw, and relax your lower spine as you take several deep belly breaths, in through your nose and out through your nose.

Routines: Gentle Yin Yoga
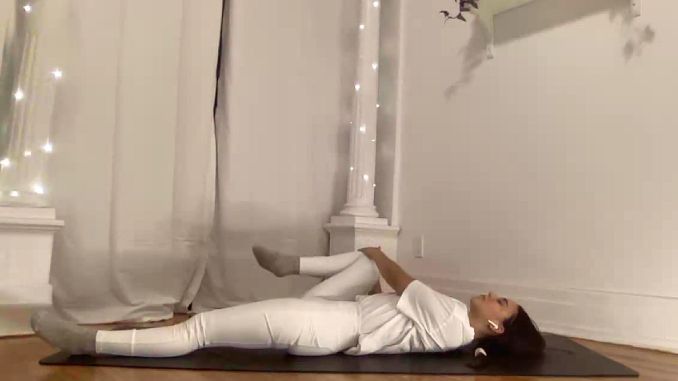
1. Single Knee to Chest
Lie on your back on the floor with your knees bent and your feet hip-width apart. Straighten your left leg, bring your right knee towards your chest, and then hold it with both hands. Then gently pull your knee towards your chest for a light stretch of your lower back and hips. Afterward, hold the position for several deep belly breaths, in through your nose and out through your mouth.
To intensify the movement, you can move your foot in a circular motion or flex it up and down with 10 repetitions.

Variation 1: Single Knee to Chest
Lie on your back on the floor with your knees bent and your feet hip-width apart. Straighten your left leg, bring your right knee towards your chest, and then hold it with both hands. Then engage your core and gently sway your knee from side to side. Start with one set of 10 repetitions.
To intensify this movement, move your knee to the side as low as your body will allow in a painless manner.
 |
 |
2. Spinal Twist
Lie on your back on the floor with your knees bent and your feet hip-width apart, relaxing your upper body. Engage your core, then bring your right knee to your chest and straighten your left leg. Twist through your lower back, pelvis, and spine to bring your right knee down to your left side. Then turn your head to the right and gaze straight ahead. Afterward, hold the position for several deep belly breaths, in through your nose and out through your mouth.
For this movement, you can place a yoga block, a bolster, a blanket, or a pillow under your right knee for comfon rt. You can hold your right knee with your left hand to put pressure on it.

Variation 1: Spinal Twist
For an advanced pose, move to Variation 1.
From the Spinal Twist position, engage your core and grab your right foot with your left hand. Extend your foot out to the side as far as you can, then flex your right foot, pushing your heel out and keeping your gaze on your right side. Afterward, hold this position for several deep belly breaths, in through your nose and out through your mouth. Then bring your knees to the center and relax. Repeat the movement on the opposite side.

3. Knees to Chest
Lie on your back on the floor with your knees bent and your feet hip-width apart. Then bring both knees to your chest and hold onto your knees with both arms. Lift your head and bring your nose to your knees for a good lower back and glute stretch. Afterward, hold this position for several deep belly breaths, in through your nose and out through your mouth. Relax and return to the starting position.
To intensify this movement, gently rock your knees from side to side.
 |

|
Repeat the sequence of movement from Single Knee to Chest up to Kee to Chest on the opposite side.
4. Happy Baby
Lie on your back on the floor with your knees bent and feet flat on the floor, relaxing your upper body. Lift your legs and hold your toes with each hand, pulling down toward the shoulders with your knees wide apart. Afterward, hold the position for several deep belly breaths, in through your nose and out through your mouth.
To intensify this exercise, you can gently rock your lower spine from side to side. Relax and return to the starting position.
 |

|
Variation 1: Happy Baby
Lie on the floor with your knees bent, relaxing your upper body. Then lift your legs and hold your toes with each hand, pulling down toward the shoulders with your knees wide apart. Afterward, hold the position for a couple of seconds, then slowly move your body to the side as you bring one knee down towards your chest while holding the opposite leg up. Repeat the movement alternately on the opposite side. Start with 1 set of 5 repetitions.
 |

|
Variation 2: Happy Baby
Lie on the floor with your knees bent, relaxing your upper body. Lift your legs and hold your toes with each hand, pulling down toward the shoulders with your knees wide apart. Engage your abdominal muscles, and spread your legs to the side, creating a wide space between your legs for a stretch while still holding on to your toes. Afterward, hold the position for several deep belly breaths, in through your nose and out through your mouth.

5. Progressive Exercises:
a. Wide-Legged Child’s Pose
Begin in a 4-point position with your hands under your shoulders and your knees under your hips, as wide apart as your body allows. Tighten your abdominal area and shift your hips back to your feet while extending both arms overhead. Lower your forehead to the floor and relax your mid-back area for a light stretch. If you want to intensify the movement, walk your hands a little further. Afterward, hold this position for several deep belly breaths, in through your nose and out through your mouth.
For this exercise, you can place a pillow between the floor and your belly for comfort.

Variation 1: Wide-Legged Child’s Pose
Begin in a 4-point position with your hands under your shoulders and your knees under your hips, as wide apart as your body allows. Tighten your abdominal area and shift your hips back to your feet while extending both arms overhead. Lower your forehead to the floor and relax your mid-back area for a light stretch. Plant your elbows on the floor beside your head and put your hands up together in a prayer pose. Afterward, hold this position for several deep belly breaths, in through your nose and out through your mouth.
For this exercise, you can place blocks under your elbows for comfort.

b. Puppy Pose
From the Child’s Pose position. Inhale as you slide your hands and body forward as you, drop your chest down on the floor, and keep your hips up toward the ceiling. Exhale as you place either your chin or forehead on the floor. Afterward, hold this position for several deep belly breaths, in through your nose and out through your mouth. Relax and return to the starting position.
For this exercise, you can place a pillow under your chest for comfort.

Variation 1: Puppy Pose
Begin in an upright kneeling position with your knees as wide apart as you can. Engage your core. Shift your hips back to your feet while extending both arms overhead to come into Child’s pose and take a deep belly breath. Slide your hands and body forward as you drop your chest down on the floor and keep your hips up toward the ceiling. Exhale as you place your forehead or chin on the floor, then gaze forward. Plant your elbows on the floor and put your hands together in a prayer pose. Afterward, hold this position for several deep belly breaths, in through your nose and out through your mouth. Relax and return to the starting position.

c. Sphynx Pose
From the Puppy Pose position. Plant your forearms on the floor at your sides with your elbows beneath your shoulders. Spread your fingers wide for a good base of support. Arch your back using your glutes and back muscle strength. Gently press your elbows into the floor directly under your shoulders. Inhale and slowly pull yourself forward, keeping your hips anchored to the mat. Afterward, hold this position for several deep belly breaths, in through your nose and out through your mouth. Relax and return to the starting position.

6. Side-Lying Chest Opener
Lie on your stomach on the floor with your feet hip-width apart, maintaining good alignment with your head, shoulders, hips, and legs. Spread your arms out to your sides and place your right ear on the floor to come into a T position. Then bend your left elbow, plant your left palm on the floor beside your chest, and bend your left knee with your toes pointing up toward the ceiling. Then roll over and lie on your right side. Plant your left foot on the floor behind your right leg, keeping your left hand on the floor for support. Afterward, hold this position for several deep belly breaths, in through your nose and out through your mouth. Return to the starting position and repeat the movement on the opposite side.
For this exercise, you can also try to reach your lower arm back with your upper arm for a more advanced pose.
 |

|
7. Fire Log Pose
Begin in an upright sitting position on the floor with your legs crossed in front of your body. Maintain good alignment with your head, shoulders, and hips. Engage your core, lift your left foot, then put it on top of your right knee. Close your eyes, extend your spine, lifting the crown of your head towards the ceiling, and slightly tuck your chin towards your chest. Then bring your awareness toward your knees. Afterward, hold this position for several deep belly breaths, in through your nose and out through your nose. Lower your knees as much as your body allows with every exhale. Relax your face, jaw, and shoulders, then return to the starting position. Repeat the movement on the opposite side.
For this exercise, you can place a pillow under your hips or just keep your legs crossed in front of your body for comfort.

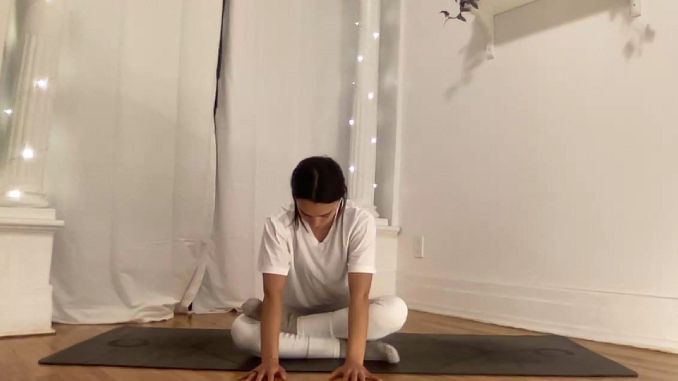
8. Fire Log Pose with Forward Fold
From the Fire Log position, engage your core and hinge through your hips to move your upper body forward. Crawl forward with your fingers on the floor for support. Tuck your chin toward your chest and hold this position for three deep belly breaths, in through your nose and out through your nose. Return to the starting position and repeat the movement on the opposite side.
For this exercise, you can keep your legs crossed in front of your body for comfort.

Cool Down: Gentle Yin Yoga
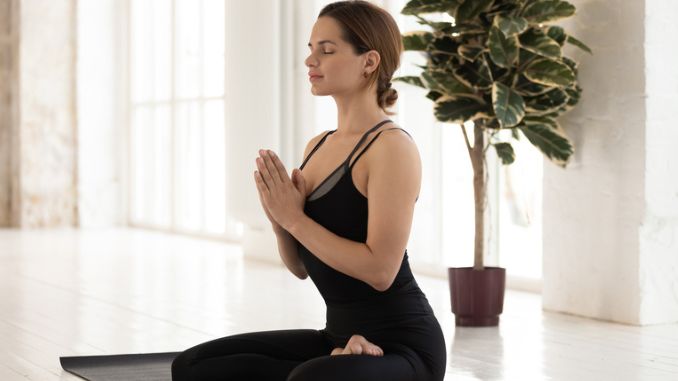
Namaste Pose
Begin in an upright sitting position on the floor with your legs crossed in front of your body. Place your hands in a prayer pose in front of your heart or head, close your eyes, and bow your head down. Hinge through your hips to lean your upper body forward and hold this position for a few seconds. Relax and return to the starting position.
 |

|
Conclusion
Gentle Yin Yoga is another practice that combines active stretching with restorative poses. It’s a great way to increase flexibility while also stimulating the flow of Qi throughout the body. The gentle movements of this practice help to stimulate the parasympathetic nervous system and reduce overall stress levels.
These gentle poses are perfect for those who are looking to relax and restore the body, as they offer a slower practice that helps to promote deeper relaxation and decrease stress levels. With regular practice, Gentle Yin Yoga can help to create a sense of balance and harmony in the body and mind.
The benefits of Gentle Yin Yoga include increased flexibility and range of motion, which are especially beneficial for those who are recovering from injuries or have limited range of motion due to aging.
These gentle stretching exercises also help to improve your posture and relieve various types of stress and tension in the body. They can help relax muscles, reduce pain, and improve overall relaxation. This practice can also help improve blood flow and circulation, which can help support the immune system and reduce inflammation.

