
Vinyasa Yoga for Muscle Release and Mobility
Vinyasa Yoga combines the fluidity and grace of traditional yoga with specific sequences and postures designed to target and release tight muscles. By incorporating breathwork and mindful movement, Vinyasa Yoga not only helps to free up restricted areas of your body but also promotes a deep sense of relaxation and inner peace. This practice offers a unique approach to improving muscle flexibility and enhancing overall physical well-being. Get ready to unlock your body's potential and discover the joy of true freedom of movement.
1. Table Top Wrist Circles
Begin in a 4-point position with your hands beneath your shoulders and your knees under your hips, while maintaining good alignment of your head, shoulders, and hips. Then ccontract your abdominal area. Start creating big circles through your wrists as you press your body weight on your hands. Repeat the sequence of movements for several repetitions. Perform the movement in the opposite direction.
 |
 |
 |
2. Wrist Flexion Squeeze
Begin in a 4-point position with your hands beneath your shoulders and your knees under your hips. Then turn your hands over one at a time, placing the top of your hand on the floor with your palm facing your body and your fingers pointing toward your midline. Afterwards, hold the position for a few seconds, then return to the starting position.
In this position, you can also turn both hands over at the same time, contract your abdominal muscles, and hold the position for a few seconds.

3. Cat-Cow with Wrist Stretch
Begin in a 4-point position with your hands beneath your shoulders and your knees under your hips. Then rotate your hands so that your fingers point toward your knees and your palms press against the floor. Tighten your core, slowly press your weight into your rotated wrist as you arch your back and tilt your head upward. Tuck your tailbone in and round your spine as you lower your head downward. Afterwards, hold each position for a couple of seconds. Repeat the sequence of movements.
 |
 |
4. Table Top Hip Circles
From the end position of Cat-Cow with Wrist Stretch, walk your hands forward with your palms pressed on the floor. Then drop your hips while straightening your legs. Then engage your core and start creating big circles with your hips as you press your body weight on your palms. Slowly move your hips to one side, then shift your hips back towards your seat. Afterwards, repeat the sequence of movements several times. Perform the movement in the opposite direction.
 |
 |
 |
 |
5. Downward Dog with Hamstring Stretch
From the end position of Table Top Hip Circles. Return to a 4-point position with your hands beneath your shoulders and your knees under your hips. Then engage your core and tuck your toes. Inhale, slowly lift your head and arch your mid-back, and push back with your arms, straightening your legs as you lift your hips. Alternately, bend your knees one at a time to lift your heel off the floor as you straighten the other leg and lower your heel to return to the Downward Dog position. Repeat the movement several times.
 |
 |
 |
6. Downward Dog with Toe Raises
From Downward-Facing Dog with Hamstring Stretch. Engage your core, inhale as you straighten both legs and push away from the floor with both hands to raise your hips high and raise your toes to lift your heels up. Keep your gaze downward. Then exhale, lowering both heels and dropping your head to return to the starting position. Repeat the movement a few times, then repeat Downward Dog with Hamstring Stretch.
 |
 |
7. Plank to Downward Dog
From the Downward Dog with Toe Raises position, inhale, roll to round your mid back, coming into a high plank position with your toes tucked under. Then bend your knees and push back with your arms, straightening your legs as you lift your hips. Repeat the sequence of movements several times.
 |
 |
 |
|
8. Downward Dog with Hip Opener
From the end position of Plank to Downward Dog’s, reach one leg up towards the sky and bend the top knee, stacking your hips. Then, pull back your shoulders in a straight line, opening the heart. Afterward, drop your forehead down towards the floor and keep your gaze behind you. Relax and return to the starting position. Repeat the movement on the opposite side.
 |
 |
9. Warrior I
From the end position of Downward Dog with Hip Opener. Lower your leg down between your arms. Then, engage your core. Afterward, inhale and drop the back heel as you reach your arms up towards the sky. Afterwards, hold this position for several deep belly breaths in through your nose and out through your mouth. Relax and repeat the movement on the opposite side.

10. Wide Legged Half Forward Fold
From the Warrior I position. Straighten the front leg as you lower both arms down, then wrap your arms behind your back by holding on to each elbow or pressing your palms together. Engage your core. Slowly, hinge through your hips to bend your upper body forward while keeping your gaze down. Afterwards, hold this position for several deep belly breaths, in through your nose and out through your mouth. Relax and return to the starting position. Repeat the movement on the opposite side.
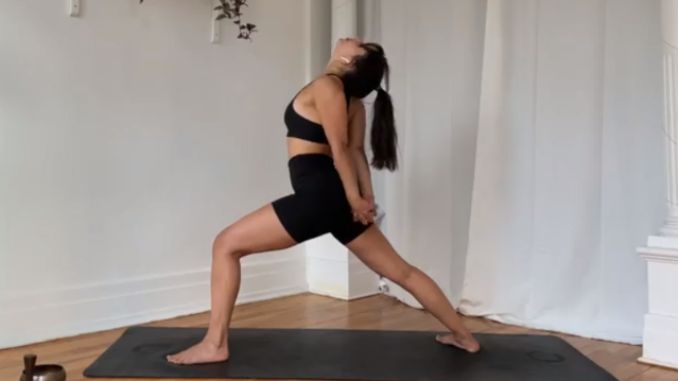
11. High Lunge with Chest Opener
From the Wide Legged Half Forward Fold position. Bend the front knee as you raise your upper body to an upright position, release and slide your hands at the back, then interlace your fingers and engage your core. Inhale, slightly lean your upper body back to open your chest. Afterwards, hold the position for several deep belly breaths, in through your nose and out through your mouth. Relax and return to the starting position. Repeat the movement on the opposite side.
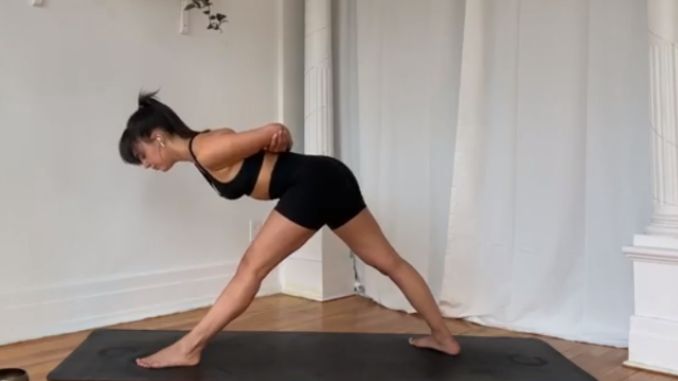
12. Humble Warrior Hands
From the High Lunge with Chest Opener position. Engage your core and hinge through your hips to bend your upper body forward, lowering your head towards the floor as you extend your joined hands away from your back. Afterwards, hold this position for several deep belly breaths, in through your nose and out through your mouth. Relax and return to an upright position.
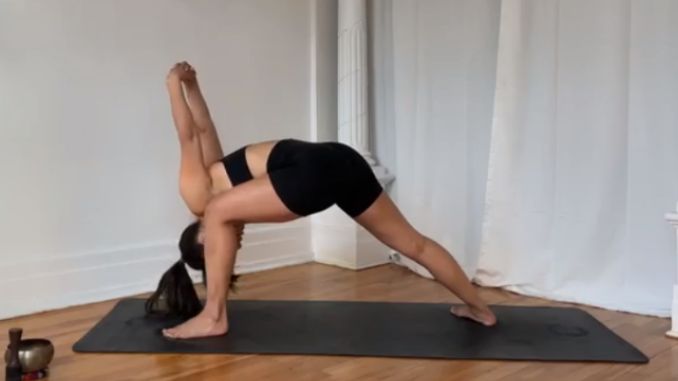
13. Dragonfly Twist
From the Humble Warrior Hands position. Release your hands from the bind and plant your right hand on the floor as you tuck the toes of your back leg against the floor. Then engage your core and twist your upper body to face the left side as you reach your left arm overhead with your gaze towards the ceiling. Afterwards, hold this position for a few seconds. Open the outer edges of your feet and gently lower your back leg along with your hips while extending your left arm behind. Hold the position for a couple of seconds. Repeat the movement on the opposite side.
 |
 |
14. Wide Legged Forward Fold Pose Side Stretch
From the end position of Dragonfly Twist, walk with your hands to the center to come into a Wide Legged Forward Fold with your toes pointing inward and your hands resting on the floor. Then grab your right ankle either with both hands or with your right hand as you plant your left hand on the floor for support. Bring your chest close with your right hand to deepen the stretch. Afterwards, hold this position for several deep belly breaths, in through your nose and out through your mouth. Relax and return to the starting position. Repeat the movement on the opposite side.

15. Wide Legged Forward Bend Twist
From the Wide Legged Forward Fold Pose Side Stretch’s position, engage your core. Reach your right hand toward the sky and twist your upper body, while maintaining good alignment and following your gaze to your right hand. Hold this position for several deep belly breaths, in through your nose and out through your mouth. Relax and return to the starting position. Repeat the movement on the opposite side.

16. Runner’s Lunge to High Plank
From Wide Legged Forward Fold Pose Side Stretch position, walk your hands forward to move to a Lunge position, maintaining good alignment with your head, shoulders, hips, and legs. Engage your core. Then step back with your left leg to come into a High Plank position. Afterwards, hold this position for several deep belly breaths, in through your nose and out through your mouth. Relax and return to the starting position. Repeat the movement on the opposite side.
 |
 |
17. Baby Cobra
From the Runner’s Lunge to High Plank’s position, lower your knees on the floor, maintaining good alignment with your head, shoulders, hips, and legs. Engage your core. Then bend your elbows to lower your body toward the floor and slightly lift up your upper back off the floor using your hands as support. Afterwards, hold this position for several deep belly breaths, in through your nose and out through your mouth. Relax and repeat the movement.

18. Upward Facing Dog
From the Baby Cobra’s position, slowly lift your mid-back upward using your arms as support, slightly arch your back, and be careful not to overextend your neck or back. Then use your back and core strength with minimal assistance from your arms. Take several deep belly breaths, in through your nose and out through your mouth. Afterwards, relax and repeat the movement, then slowly raise back up to return to a Downward Dog position.

Depending on your comfort level, repeat each movement for another set of repetitions after the repetition on the opposite side.
19. Happy Baby
Lie on your back on the floor with your knees bent and feet flat on the floor, relaxing your upper body. Then lift your legs and hold your toes with each hand, pulling down toward the shoulders with your knees wide apart. Afterwards, hold the position for several deep belly breaths, in through your nose and out through your mouth.
To intensify this exercise, you can gently rock your lower spine from side to side.

Variation Exercise
Lie on the floor with your knees bent, relaxing your upper body. Lift your legs and hold your toes with each hand, pulling down toward the shoulders with your knees wide apart. Then hold the position for a couple of seconds, then slowly move your body to the side as you bring one knee down towards your chest while holding the opposite leg up. Afterwards, repeat the movement alternately on the opposite side.

20. Curling Like a Ball
Lie on your back with your knees bent and your feet flat on the floor. Bring both knees to your chest and hold onto your legs with both arms, looking for a light stretch in the lower back and glutes. Close your eyes and hold the position for a couple of seconds. Then slowly raise your back, bringing your nose towards your knees. Relax and return to the starting position.

21. Bridge
Lie on your back with your knees bent and your feet flat on the floor, relaxing your upper body. Place your arms at your side. Then contract your abdominal area, then push from your heels to lift your hips. Maintain good alignment with your head, shoulders, hips, and knees. Afterwards, hold this position for several deep belly breaths, in through your nose and out through your mouth. Relax and return to the starting position.
Moreover, to intensify the stretch, clasp your hands under your hips and gently bring your hips down on your joined hands. Hold this position for a few belly breaths. Repeat the movement.

22. Knees to Chest
Lie on your back with your knees bent and your feet flat on the floor. Then bring both knees up towards your chest and hold onto your knees with both arms, looking for a light stretch in the lower back and glutes. Afterwards, hold this position for several deep belly breaths, in through your nose and out through your mouth. Relax and return to the starting position.
To intensify the stretch, gently rock your knees from side to side.

23. Curling Up and Down
From the Knees to Chest position, place your hands under your knees. Engage your core. Then bring your knees toward your chest and begin to roll up and down through the spine, allowing your arms, shoulders, and neck to relax completely. Repeat the movement. Return to an upright sitting position.
 |
 |
24. Hero Pose
Move to a sitting position with your knees bent, feet out to the sides, and your toes pointing at a 45-degree angle. Then place your thumbs on the soles of your feet and contract your core. Hold this position for several deep belly breaths, in through your nose and out through your mouth.
Moreover, to intensify the stretch, place your hands behind your back with your palms pressed on the floor and your fingers pointing forward.

25. Recline Hero Pose
From the Hero Pose, engage your core. Gently bend and lower your elbows as you lower your upper body backward as much as your body allows. Then plant your elbows on the floor for support. Hold this position for several deep belly breaths, in through your nose and out through your mouth.
However, if you feel pain in this movement, immediately get up and stop. But if this pose is too easy for you, you can proceed with Sleeping Thunderbolt Pose

26. Sleeping Thunderbolt Pose
From Variation 1 - Recline Hero Pose, engage your core. Then lower your upper body all the way down on the floor. Place your thumbs on the soles of your feet and take several deep belly breaths, in through your nose and out through your mouth.
Moreover, you can also grab your elbows overhead if it feels comfortable.
If you feel pain in this movement, immediately get up and stop.

27. Windshield Wipers
Begin in an upright sitting position on the floor with your knees bent and your feet flat on the floor, wider than shoulder-width apart. Maintain good alignment in your upper body. Then plant your hands on the floor behind you for support. Engage your core and rotate to lower your bent knees to one side. Return to the starting position and repeat the movement on the opposite side. Repeat the movement in alternate directions.
 |
 |
28. Seated Forward Fold
Begin in an upright sitting position on the floor, maintaining good alignment with your head, shoulders, and hips. Then extend both legs in front of your body with your feet together and your toes pointing upward. Contract your core, then hinge through your hips to bend your upper body forward. Reach toward your toes or your ankles with both hands. Afterwards, hold this position for several deep belly breaths, in through your nose and out through your mouth. Relax and return to the starting position.
To make the stretch easier, just stretch your legs.

29. Seated Spinal Twist
Begin in an upright sitting position with your knees bent and your feet flat on the floor. Then lower your right leg to bring your left leg over your right. Engage your core. Extend your left arm at your back, relaxing your upper body, then place your right elbow on top of your left knee with your fingers in mudra, then twist your upper body to one side, as far as comfortably as you can. Afterwards, hold this position for several deep belly breaths in through your nose and out through your mouth. Relax and return to the starting position. Repeat the movement on the opposite side.

30. Corpse Pose
Lie on your back on the floor, maintaining good alignment with your head, shoulders, hips, and legs. Then place your arms to your sides with your legs extended and relaxed, eyes closed, and palms facing up. Hold this position for several deep belly breaths, in through your nose and out through your mouth.

31. Cobbler’s Pose
Lie on your back on the floor with your knees bent and your feet flat on the floor. Maintaining good alignment with your head, shoulders, hips, and legs. Then place your arms at your sides with your palms facing up, relaxing your upper body. Bring the soles of your feet together and open your knees out at your sides. Afterwards, hold this position for several deep belly breaths, in through your nose and out through your mouth. Relax and return to the starting position.

32. Full Body Stretch with Wrist Circles
Lie on your back on the floor, maintaining good alignment with your head, shoulders, hips, and legs. Place your arms at your sides and extend your legs. Then close your fists and start creating small circles with your wrists, then flex both feet to take a deep stretch. Repeat the movement and return to the starting position

33. Full Body Stretch
Lie on your back on the floor, maintaining good alignment with your head, shoulders, hips, and legs. Bring your hands overhead and interlace your fingers. Then tke a big reach of your arms and straighten both legs to take a deep stretch. Afterwards, hold this position for several deep belly breaths, in through your nose and out through your mouth. Relax and return to the starting position, then repeat Curling like a Ball to come up into a sitting position.

34. Prayer Hands
Begin in an upright sitting position, cross your left ankle over the top of your right shin. The sole of your left foot should also face upwards, and the top of your foot and ankle should rest on your hip crease. Maintaining good alignment with your head, shoulders, and hips. Pressed your palms together in a prayer position. Engage your core and close your eyes. Hold the position for several deep belly breaths, in through your nose and out through your mouth.

The Singing Bowl
At this time, use the singing bowl to create a sense of closure and transition from the physical practice to a state of stillness and reflection. To do this:
Begin in an upright sitting position, while maintaining good alignment with your head, shoulders, hips, and legs. Cross your legs, then hold the singing bowl with your palm. Strike the singing bowl once with its mallet, hold the bowl close to your ear and listen to its sound until it fades. Repeat the movement.
The resonant sound of the singing bowl helps you return to a calmer and more centered state, allowing you to absorb the benefits of the class fully.
 |
 |
 |
With each practice, you will witness the gradual unveiling of your body's flexibility and strength and the joyous revelation of true freedom of movement. Through Vinsaya Yoga, you will embark on a path of self-discovery, unearthing the beauty and harmony within you.
Embrace this opportunity to transcend limitations, let go of the physical and mental barriers that have confined you, and experience the transformative power of Vinyasa Yoga. Allow yourself to be guided by the warmth and encouragement of this practice as it embraces you with open arms and nurtures your growth. And venturing on this journey will enhance your physical well-being and nurture your spirit.
