A Beginners Guide to Yin Yoga
If you have ever taken a yoga class, you know that there are many different types and styles of yoga. Some focus on strength and building muscle, balance, and agility, while others help you get in touch with your spiritual side. Generally, yin yoga is one of the lesser-known styles of yoga out there. However, it is quickly gaining popularity as more people learn about its benefits. Yin yoga focuses on passive stretching postures to stimulate the yin energy in our bodies (hence the name). In this article you'll learn some Yin Yoga For Beginners that’s perfect for anyone who wants to increase their flexibility and reduce stress simultaneously.
What Is Yin Yoga?
At first, an ancient Chinese method of passive stretching called yin yoga is used to enhance flexibility and reduce muscle and body tension. Accordingly, this form of yoga is slow-paced and focuses on long-held postures. It differs from other forms of yoga in that the poses are held for 2-5 minutes on the floor (or a surface of your choice). Other styles of yoga do not usually stretch connective tissues such as ligaments and tendons. In yin yoga, the connective tissues of the body are emphasized. Yin yoga is beneficial for those with a lot of tension, weak joints, injuries, and a lot of scar tissue because it focuses on these connective tissues.
Although yin yoga has its roots in ancient Chinese culture and is one of the five aspects of Taoist meditation. This slow-paced style of yoga uses counter-poses of opposite positions to help tone muscles while relaxing the mind and body. It’s different from other styles of yoga because it’s performed on the floor, typically on a mat or towel, with little or no support under your knees or elbows.
The Benefits of Yin Yoga
-
Improve Flexibility
While many yoga styles focus on strength and building muscle, yin yoga is perfect for people who want to increase their flexibility. While yin yoga may not gain you the same flexibility as other styles, it can still help improve your range of motion and reduce muscle tension.
-
Release Toxins
-
Improve Joint Health and Mobility
How to Perform a Yin Yoga Stretch
It is important to note that you shouldn’t expect to be inversions, arm balances, and other vigorous postures, as these are not included in yin yoga. However, many people report increased flexibility and mobility after practicing yin yoga regularly, even if they don’t notice it immediately. You can perform a yin yoga stretch while lying on the floor or sitting on a chair or bench in a quiet room. You want to avoid distractions that may cause you to lose focus on your breathing and the stretch itself. Once you have found a comfortable position, focus on your breath and allow it to flow naturally. Take slow, deep breaths, and try to release any built-up tension in your muscles as you exhale.
Warm Up
1. Breaths
For this exercise, use a bolster, pillow, or folded blanket for a comfortable seat.
Begin in an upright sitting position on the bolster on the floor with your legs crossed in front of you. Maintain good alignment of your head, shoulders, and hips. And then, place your hands on your knees. Close your eyes and hold this position for several deep belly breaths, in through your nose and out through your mouth.

2. Wrist Circles
Begin in an upright sitting position on the floor with your legs crossed in front of you. Maintain good alignment of your head, shoulders, and hips. Lift both hands to head level and start circling movements from one direction to the other. Repeat the movement for several deep belly breaths.
 |
 |
3. Wrist Stretch
Begin in an upright sitting position on the floor with your legs crossed in front of you. Maintain good alignment of your head, shoulders, and hips. And then, place your hands together at your heart center and turn your palms around while keeping your wrist in place. Repeat the movement from one direction to the other.
 |
 |
 |
4. Arm Stretch
Begin in an upright sitting position on the floor with your legs crossed in front of you. Maintain good alignment of your head, shoulders, and hips. Interlace your fingers at your heart center and push your hands forward, palms facing outward. Reach your arms out as much as possible and drop your head, arching your back. Hold this position for several deep belly breaths. Slowly move your arms up and bend your head backward. Take several deep belly breaths and return to the starting position.
 |
 |
Arm Stretch
Routines
1. Cross-Legged Forward Fold
For this exercise, use a bolster, a pillow, or a stack of books for support.
Begin in an upright sitting position on the floor with your legs crossed in front of you. Maintain good alignment of your head, shoulders, and hips. And then, place a bolster on the floor in front of your body and a pillow on your thighs. After thatTighten your abdominal area and hinge from your hips to bend your upper body forward, resting your upper body on the pillow. Extend your arms in front of your body and plant your hands on the floor. Lower your head down, relaxing your mid-back area for a light stretch. Hold this position for several deep belly breaths and return to the starting position.
To intensify this movement, stretch your back more by moving your hands forward.
 |
 |
Variation 1 - Cross-Legged Forward Fold
For this exercise, use a bolster, a pillow, or a stack of books for support.
Begin in an upright sitting position on the floor with your legs crossed in front of you. Maintain good alignment of your head, shoulders, and hips. And then, place a bolster on the floor in front of your body and a pillow on your thighs. Interlace your fingers and put them behind your head, on your upper neck. Tighten your abdominal area and hinge from your hips to bend your upper body forward, resting your upper body on the pillow. Pull your neck down gently, relaxing your mid-back area for a light stretch. Hold this position for several deep belly breaths and return to the starting position.
 |
 |
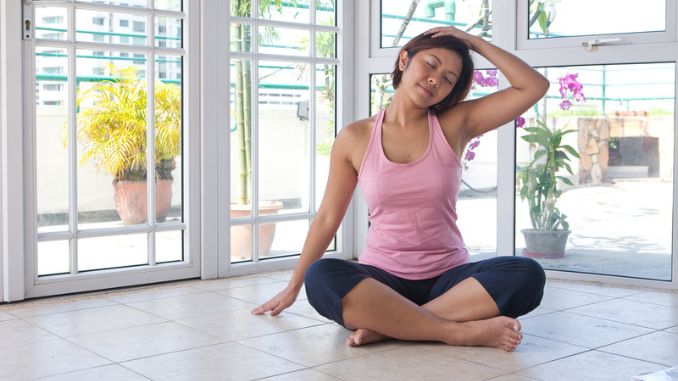
2. Neck Stretch
Begin in an upright sitting position on the floor with your legs crossed in front of you. Maintain good alignment of your head, shoulders, and hips. And then, place your hands on your knees. Raise your right hand overhead and place your right hand on your left ear. Engage your core. Slightly extend your neck and, on your exhale, slowly pull your head to the right until you feel the resistance. After that, hold this position for several deep belly breaths. Repeat the movement on the opposite side.
To intensify this movement, place your left hand behind your hip.
 |
 |
Variation 1 - Neck Stretch
Begin in an upright sitting position on the floor with your legs crossed in front of you. Maintain good alignment of your head, shoulders, and hips. And then, place your hands on your knees. Raise your right hand and point it at a 45-degree angle upward on your right side. Then put your hand behind your head. Engage your core. Slightly extend your neck and, on your exhale, slowly pull your head down until you feel the resistance. After that, hold this position for several deep belly breaths. Repeat the movement on the opposite side.
 |
 |
 |
3. Child’s Pose
Lie on your back on the floor with your knees bent and feet flat on the floor, hip-width apart. You can either extend your arms at your sides about 45 degrees away from your body, palms facing up, or place one hand on your chest and the other on your belly. Engage your core, then bring the soles of your feet together. Open your knees wide at your sides and relax your body. After that, hold this position for several deep belly breaths, in through your nose and out through your mouth.
For this exercise, you can use pillows, folded blankets, bolsters, cushions, or yoga blocks at the side of your knees for support.
 |
 |
4. Butterfly
Lie on your back on the floor with your knees bent and feet flat on the floor, hip-width apart. And then, bring both knees up to your chest and grab your knees with both arms for a light stretch in the lower baand glutes. Lift your head towards your knees at the center to intensify this movement. After that, hold this position for several deep belly breaths, in through your nose and out through your mouth. Return to the starting position.
To intensify this exercise, gently rock from side to side or move your knees in circular motions.
 |
 |
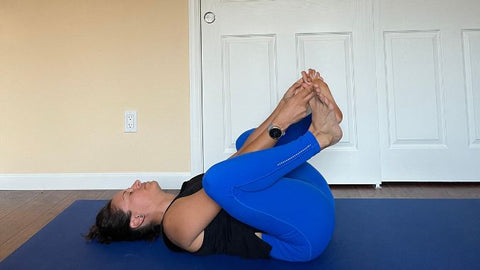
5. Knees to Chest
Lie on your back on the floor with your knees bent and feet flat on the floor, hip-width apart. Bring both knees up to your chest and grab your knees with both arms for a light stretch in the lower back and glutes. And then, lift your head towards your knees at the center to intensify this movement. After that, hold this position for several deep belly breaths, in through your nose and out through your mouth. Return to the starting position.
To intensify this exercise, gently rock from side to side or move your knees in circular motions.
 |
 |
6. Happy Baby
Lie on your back on the floor with your knees bent and feet flat on the floor, hip-width apart. Engage your core. Lift both your arms and feet towards the sky, coming to a happy baby. And then, bring your knees to your chest, grab your big toes with each of your hands, and then move your feet upwards. After that, hold this position for several deep belly breaths. Relax and return to the starting position.
To intensify this movement, extend your feet out to your sides or gently rock your feet from side to side.
 |
 |
7. Single Knee to Chest
Lie on your back on the floor with your knees bent and feet flat on the floor, shoulder-width apart. Engage your core. And then, bring one knee towards your chest and gently pull it with both hands, lightly stretching your lower back and hips. You can hold your knee with one hand and the other on your hip. After that, gold this position for several deep belly breaths. Return to the starting position and repeat the movement on the opposite side.
To intensify this movement, move your foot in a circular motion or up and down, and rock your bended knee from side to side.
 |
 |
8. Frog Pose
For this exercise, use a pillow for support.
To perform this exercise, lay your stomach on the floor with your legs spread shoulder-width apart. Maintain good alignment in your shoulders, hips, and legs. After that, position a pillow under your head between your hands. Concentrate on your core as you bend one leg to the side and turn your head to the opposite side, keeping your arms extended on the ground. Take several deep belly breaths as you inhale through your nose and exhale through your mouth. Then relax and repeat the motion on the other side.
 |
 |
Variation 1 - Frog Pose
For this exercise, use a pillow for support.
Lie on your stomach on the floor with your legs shoulder-width apart. Maintain good alignment in your shoulders, hips, and legs. And then, place a pillow beside your hip. Engage your core. Bend one knee out to the side and rest it on the pillow. Turn your head to the opposite side with your arms outstretched on the floor. After that, hold this position for several deep belly breaths, in through your nose and out through your mouth. Relax and repeat the movement on the opposite side.

Cool Down
1. Corpse Pose
Lie on your back on the floor, maintaining good alignment of your head, shoulders, hips, and legs. And then, extend your arms out at your sides. Close your eyes and relax your entire body. After that, hold this position for several deep belly breaths, in through your nose and out through your mouth.

2. Arms & Legs Stretch
Lie on your back on the floor, maintaining good alignment of your head, shoulders, hips, and legs. And then, engage your core and reach both arms overhead while pointing your toes in the opposite direction to stretch your back. After that, hold this position for several deep belly breaths.

3. Lying Side Bend
Lie on the floor, maintaining good head alignment, shoulders, hips, and legs. Engage your core and reach both arms overhead. Bring both knees towards your chest and bend your body to one side. Let your head rest on your outstretched arm and your other hand on your c. Hold this position for several deep belly breaths.

Remember that the idea is to relax, so you don’t have to focus on the poses themselves. All of these should be painless. You should talk to your doctor before practicing Yin Yoga For Beginners if you have a health condition.
Tips for Your First Time Taking a Yin Yoga Class
If you are interested in trying yin yoga for the first time, it is important to remember that it is a very different practice than your typical hot and sweaty yoga class. There will be very little, if any, heating up of muscles in the class. You should get as comfortable as possible. You can lie on a yoga mat or towel, wear loose and comfortable clothes, and put on some soft and soothing music. Try to clear your mind before you start the class. Don’t be surprised if you find yourself struggling to focus on your breathing at first. This is completely normal, and you will get better at it with time.
Conclusion
In conclusion, Yin yoga is a great way to stay fit, flexible, and focused. It is important to keep in mind that it takes time for the benefits of yoga to show up. Don’t expect immediate results. With consistent practice, you can expect to feel more relaxed and stress-free, have improved joint health, and gain better overall flexibility. However, it’s important to note that not all yoga styles are for everyone. Make sure you talk with your yoga instructor about their class style and what benefits it will bring to you before committing to a regular class.