Yoga for Neck & Shoulders
At present, we often find ourselves sitting in front of a computer screen for long hours, causing strain and tension in our necks and shoulders. This can lead to chronic pain, stiffness, and even headaches. The good news is that yoga for neck and shoulders is an effective way to alleviate these symptoms and promote overall wellness. Whether you’re a seasoned yogi or a beginner, incorporating yoga into your daily routine can help you achieve a healthier, happier lifestyle.
Explore these effective yoga poses for neck and shoulders we’ve specially compiled for all fitness levels and try them at home. Experience a relaxed and pain-free body!
Warm-Up
1. Breaths
For this exercise, place a pillow or a yoga block under your seat or between your feet for comfort.
Begin in an upright kneeling position with your knees closed together or knees wider than shoulder-width apart and your feet close together. Shift your hips back to rest your seat on your feet, while maintaining good alignment with your head, shoulders, and hips. Place one hand on your chest and the other on your belly. Then find awareness in your practice today. Close your eyes and hold this position for several deep belly breaths. Inhale through your nose, then count up to 5 seconds, and exhale through your nose, counting up to 7 seconds.

Breaths
Routines
1. Wrist Circles
Begin in an upright kneeling position with your knees wider than shoulder-width apart and your feet close together. Shift your hips back to rest your seat on your feet, while maintaining good alignment with your head, shoulders, and hips. Then raise your hands and make big circles using your wrists from one direction to the other. Repeat the movement several times.
 |
 |
 |
Wrist Circles
2. Wrist Extension Stretch
Begin in an upright kneeling position with your knees shoulder-width apart and your feet close together. Shift your hips back to rest your seat on your feet, while maintaining good alignment with your head, shoulders, and hips. Extend your right arm in front of your body at chest height, with your palm facing forward and your fingers pointing upward. Using your left hand, pull your fingers toward your body to intensify the stretch. Hold the position for several deep belly breaths, in through your nose and out through your mouth. Relax and repeat the movement on the opposite side.

Wrist Extension Stretch
3. Infinity Circles
Begin in an upright kneeling position with your knees shoulder-width apart and your feet close together. Shift your hips back to rest your seat on your feet, while maintaining good alignment with your head, shoulders, and hips. Raise your hands at the chest-height level and interlace your fingers. Then roll your wrists into infinity circles, drawing a figure 8 from one direction to the other. Moreover, repeat the movement several times.
 |
 |
Infinity Circles
4. Progressive Exercises 1:
a. Arm Stretch
Begin in an upright kneeling position with your knees shoulder-width apart and your feet close together. Shift your hips back to rest your seat on your feet, while while maintaining good alignment with your head, shoulders, and hips. Interlock your fingers, then stretch both your arms in front of you, palms facing forward. Drop your head in between your arms, rounding your spine, and hold the position for a few seconds. Inhale and slowly move your arms up toward the ceiling. Gaze up and hold the position for a few seconds. Exhale, move your arms back in front, repeat the movement a couple of times, and return to the starting position.
 |
 |
Arm Stretch
b. Seated Heart Opener
From the end position of the Arm Stretch, clasp your hands together behind your hips. Inhale and reach your arms downward, arching your back and opening your chest and shoulders. Moreover, slowly drop your head backward and hold the position for a few seconds. Then exhale and gently move to the Rabbit Pose with Bound Arms.

Seated Heart Opener
c. Rabbit Pose with Bound Arms
At this point, from the Seated Heart Opener position, slowly bend your upper body forward and lower your forehead on the floor. Slowly push your bound arms away from your lower back, slowly lift your hips and position the crown of your head on the floor for balance. Inhale as you hold the position for a couple of seconds, then exhale as you lower your bound arms at your back and return to an upright position.

Rabbit Pose with Bound Arms
5. Neck Tilts
Begin in an upright kneeling position with your knees shoulder-width apart and your feet close together. Shift your hips back to rest your seat on your feet, while while maintaining good alignment with your head, shoulders, and hips. Clasp your hands behind your back, then place them right behind your left hip. Close your eyes and engage your core. Tilt your neck to drop your head towards your left side. Afterwards, hold the position for 3 deep belly breaths and return to the starting position. Repeat the movement on the opposite side.
Neck Tilts
6. Side Neck Stretch
Begin in an upright kneeling position with your knees shoulder-width apart and your feet close together. Shift your hips back to rest your seat on your feet, while while maintaining good alignment with your head, shoulders, and hips. Flex your right hand and extend your right arm on your side, palms facing down and fingers pointing up. Reach your left hand overhead, then place it on your right ear. Take a deep breath in, and on your exhale, allow the weight of your arm to gently lower your head to the left for a light stretch on your neck. Afterwards, hold this position for 3 deep belly breaths and relax. Return to the starting position. Repeat the movement on the opposite side.

Side Neck Stretch
7. Side Bends
Begin in an upright kneeling position with your knees shoulder-width apart and your feet close together. Shift your hips back to rest your seat on your feet, while maintaining good alignment with your head, shoulders, and hips. Plant your right hand on the floor at your side for support as you bend your upper body to the right side. Moreover, inhale, reach your left arm overhead and gaze toward the ceiling. Exhale, and place your left hand behind your head. Then repeat the movement on the opposite side.
To modify this exercise, you can walk your hands on the floor further to the side, bend the elbow, and drop it to the floor.
 |
 |
Side Bends
8. Child’s Pose
Begin in an upright kneeling position with your knees and feet close together. Shift your hips back to rest your seat on your feet, while maintaining good alignment with your head, shoulders, and hips. Tighten your abdominal area. Walk your fingers across the floor in front of you as you bend your upper body forward. Moreover, drop your forehead on the floor, relaxing your arms and mid-back area. Gently rock your head from side to side, then hold this position. Take 3 deep belly breaths in through your nose and out through your mouth.
Moreover, you can keep your knees as wide apart as you want for comfort and use a yoga block or a pile of textbooks under your forehead for much-needed support.

Child’s Pose
9. Cat-Cow
Begin in a 4-point position with your hands beneath your shoulders and your knees under your hips. Contract your abdominal area. Inhale and slowly lift your head as you drop your belly down, arching your mid-back. Moreover, alternate by exhaling and slowly lowering your head down as you round out your mid-back. Repeat the sequence of movements.
 |
 |
Cat-Cow
10. Disco Cow (Barrel Roll)
Begin in a 4-point position with your hands beneath your shoulders and your knees under your hips. Contract your abdominal area. Roll your mid back to bend it to one side, arch your mid back. Moreover, circle your upper body to bend your mid back on the opposite side, then round your mid back out. Afterwards, repeat the sequence of movements for several repetitions. Perform the movement on the opposite side.

 |
 |
 |
 |
Disco Cow (Barrel Roll)
Variation 1 - Disco Cow (Barrel Roll)
Begin in a 4-point position with your hands beneath your shoulders and your knees under your hips. Contract your abdominal area. Do some circles with your body around your hands, keeping your hands and knees grounded on the floor. Moreover, start moving to one side, then forward, to the opposite side, and backward. Repeat the sequence of movements several times. Perform the movement on the opposite side.
 |
 |
 |
 |
Variation 1 - Disco Cow (Barrel Roll)
Variation 2 - Disco Cow (Barrel Roll)
Begin in a 4-point position with your hands beneath your shoulders and your knees under your hips. Contract your abdominal area. Then start creating big circles with your hips as you press your body weight on your palms. Slowly move your hips to one side, drop your hips while straightening your legs. Move to the opposite side as you bend your knees again, shift your hips backward. Afterwards, repeat the sequence of movements several times. Perform the movement on the opposite side.
Try anything that may feel good for you as a variation.
 |
 |
 |
 |
Variation 2 - Disco Cow (Barrel Roll)
11. Table Top Pose Wrist Stretch (Bharmanasana Wrist Stretch)
Begin in a 4-point position with your hands beneath your shoulders and your knees under your hips. Rotate your hands so that your fingers point toward your knees and your palms press against the floor. Moreover tighten your core, slowly press your weight into your rotated wrist, and keep your back straight, your hips up, and your belly button up. Afterwards, hold this position for a few seconds, then return to the starting position.
Table Top Pose Wrist Stretch
Variation 1 - Table Top Pose Wrist Stretch (Bharmanasana Wrist Stretch)
Begin in a 4-point position with your hands beneath your shoulders and your knees under your hips. Rotate your hands so that your fingers point toward your knees. Tighten your core, inhale, and slowly lift your head as you drop your belly down, arching your mid-back. Moreover, alternate by exhaling and slowly lowering your head down as you round out your mid-back. Then repeat the sequence of movements.

|
 |
Variation 1 - Table Top Pose Wrist Stretch (Bharmanasana Wrist Stretch)
Variation 2 - Table Top Pose Wrist Stretch (Bharmanasana Wrist Stretch)
Begin in a 4-point position with your hands beneath your shoulders and your knees under your hips. Rotate your hands so that your fingers point toward your knees. Then tighten your core and alternately shift your hips back to your feet, lifting only your wrists off the floor and extending your arms. Hold this position for a few seconds and return to the starting position.
Moreover, for an easier variation, rock your upper body back and forth several times.

|
 |
Variation 2 - Table Top Pose Wrist Stretch (Bharmanasana Wrist Stretch)
12. Wrist Flexion Squeeze
Begin in a 4-point position with your hands beneath your shoulders and your knees under your hips. Moreover, turn your hands over one at a time, placing the top of your hand on the floor with your palm facing your body and your fingers pointing toward your midline. Afterwards, hold the position for a few seconds, then return to the starting position.
You can also turn both hands over at the same time, contract your abdominal muscles, and hold the position for a few seconds.
Wrist Flexion Squeeze
13. Downward Dog with Hamstring Stretch
Begin in a 4-point position with your hands beneath your shoulders and your knees under your hips. Tighten your abdominal muscles, push back with your arms, and straighten your legs as you lift your hips and tuck your toes against the floor. Alternately, bend your knees one at a time to lift your heel off the floor as you straighten the other leg and lower your heel to return to the Downward Dog position. Repeat the movement several times, then move into the Crescent Lunge position.

|
 |
Downward Dog with Hamstring Stretch
14. Downward Dog with Heel Raises
Begin in a 4-point position with your hands beneath your shoulders and your knees under your hips. Then tighten your abdominal muscles, straighten both legs, and push away from the floor with both hands to raise your hips high. Inhale and lift your hips and heels higher until only your toe tips touch the floor. Gaze forward and hold this position for several seconds. Exhale, lower both heels and drop your head to return to the starting position. Repeat the movement a few times.

|
 |
Downward Dog with Heel Raises
Variation 1 - Downward Dog with Heel Raises
Begin in a 4-point position with your hands beneath your shoulders and your knees under your hips. Tighten your abdominal muscles, push back with your arms, and lift your hips. Slightly bend your knees, inhale, then raise your hips and heels higher, tucking your toes against the floor. Afterwards, keep your gaze forward and hold this position for several seconds. Exhale, lower both heels and drop your head to return to the starting position. Repeat the movement a few times.

|
 |
Variation 1 - Downward Dog with Heel Raises
15. Crescent Lunge
From the Downward Dog position, take a big step forward with one foot, while keeping your toes pointing straight ahead. Lower your back knee to the floor and reach overhead with both arms. Then tighten your abdominal area and shift your hips forward. Clasp your hands together and place them behind your head. Press your weight into your front heel, slightly arch your back, and use your hands to gently pull your neck up as you stretch your neck towards the ceiling. Afterwards, gaze towards the ceiling and hold this position for several seconds. Relax and return to the starting position. Repeat the movement on the opposite side.
Crescent Lunge
16. Dragonfly Twist
From the Crescent Lunge’s position, then lower your upper body by planting your right hand on the floor. Tuck the toes of your back leg against the floor. Engage your core and twist your upper body to face the left side as you reach your left arm overhead. Lift your knees, gaze towards the ceiling, and hold this position for several seconds. Afterwards, repeat the movement on the opposite side.
You can place your raised hand behind your mid-back to intensify this movement.
Dragonfly Twist
17. Halfway Lift (Ardha Uttanasana)
From the Dragonfly Twist position, plant your back leg forward. Contract your abdominal core, inhale, and hinge through your hips to raise your upper body to 90 degrees. Place your hands on your knees for support. Afterwards, keep your back straight, your hips up, your belly button up, and your gaze forward. Hold the position for a few seconds, then exhale. Move into the Forward Fold position.
To make this exercise more challenging, you can place your hands on your shin or fingers reaching down the floor.
Half Lift
18. Forward Fold
From the Halfway Lift position, contract your abdominal core, lower your hands to the floor, and bring your head closer to your knees. Then keep your spine long, slightly bend your knees, and move your head from side to side. Relax and move into the Chest Stretch with Forward Fold pose.
Forward Fold
19. Chest Stretch with Forward Fold
From the Forward Fold's end position, then place your hands behind your back and interlace your fingers. Then engage your core and straighten your arms as you lift your joined hands toward the ceiling, away from your mid-back. Gently straighten your legs, move your head closer to your knees as much as you can, and raise your arms further away from your back for a deeper stretch. Afterwards, hold this position for several deep belly breaths. Relax and return to the starting position.
Chest Stretch with Forward Fold
Variation 1 - Chest Stretch with Forward Fold
From the Chest Stretch with Forward Fold position, then gently turn your chest to the left as you straighten your left leg and move your clasped hands further away to the right, while opening your shoulders as you gaze upward. Afterwards, hold this position for a few seconds, and return to the starting position. Repeat the movements on the opposite side
 |

|
Variation 1 - Chest Stretch with Forward Fold
20. Happy Baby
Lie on your back with your knees bent and your feet flat on the floor. Engage your core. Then bring your knees to your chest and hold onto your big toes. Pull your knees closer to your chest and rock your hips from side to side. You can grab the outer edges of each foot and alternately pull one leg out to the side or both simultaneously. Afterwards, repeat the movement several times. Relax and return to the starting position.
Happy Baby
21. Knees to Chest
Lie on your back with your knees bent and your feet flat on the floor. Engage your core. Bring both knees toward your chest, hold onto it with both arms, and bring your nose towards your knees. Hold this position for a few seconds, then relax. Return to the starting position. Knees to Chest
22. Cow Face Arms
For this exercise, you can sit on a pillow or yoga block for comfort.
To practice yoga for neck and shoulders, begin in an upright kneeling position with your knees and feet hip-width apart. Shift your hips back to rest your seat on your feet, while maintaining good alignment with your head, shoulders, and hips. Use one arm and reach your back, and use the other hand to pull it more towards the center. Clasp your fingers together if you can. Hold this position for a few deep belly breaths, then relax. Afterwards, repeat the movement on the opposite side.
It’s alright if you can’t reach or bind your hands together at the moment.
Cow Face Arms
23. Eagle Arms Pose
For this exercise, sit on a pillow or yoga block for comfort.
Practicing yoga for neck and shoulders, begin in an upright sitting position on a pillow with your legs crossed, maintaining good alignment with your head, shoulders, and hips. Then contract your core. Cross your arms in front of your body by placing your left arm over the other at shoulder height, then wrapping at the elbows and wrists. Inhale as you bring your arms up and gaze toward the middle of your lower arm. Close your eyes, relax your jaw, and hold this position for a few deep belly breaths. Exhale as you unwrap your hands. Afterwards, repeat the movement on the opposite side.
To make this movement more challenging, you can slightly arch your back and lift your arms higher towards the ceiling.
Cool Down
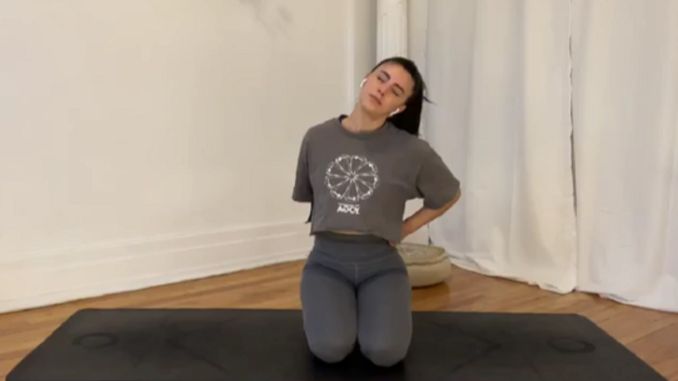
1. Neck Stretches
For this exercise, sit on a pillow or yoga block for comfort.
To practice yoga for neck and shoulders, begin in an upright sitting position on a pillow with your legs crossed, maintaining good alignment with your head, shoulders, and hips. Slowly lower your chin towards your chest, then slowly extend your head facing the ceiling. Afterwards, relax and bend your neck from one side to the other, lowering your ear towards your shoulder. Repeat the movement several times, holding each position for a few seconds

|
 |
Neck Stretches
Practicing neck and shoulder yoga benefits everyone, regardless of age, gender, or fitness level. This form of yoga can help relieve tension, reduce stress, improve posture, and increase flexibility in the shoulder and neck. By incorporating these yoga poses for neck and shoulder into your daily routine, you can experience the physical and mental benefits of this practice.
Moreover, it’s important to note that while neck and shoulder yoga can provide many benefits, it is essential to practice these poses safely and with the proper technique. Additionally, integrating mindfulness and conscious breathing techniques into your practice can enhance the benefits of neck and shoulder yoga. By focusing on the present moment and connecting with the breath, you can deepen your mind-body connection and promote a sense of inner peace and calm.
These yoga poses don’t have to be time-consuming or complicated, so your body and mind will thank you if you incorporate them into your routine.